LVM recovery

Few days ago i made mistake and forced fsck to check partition that contain LVM instead of logic volume, as result i got broken LVM metadata. I was unable to see volume group an logic volumes.
pvs output looked like that:

# pvs -v

Scanning for physical volume names
Incorrect metadata area header checksum

I tried to run pvck but it did not help me, it founded corrupted metadata but did not repair LVM:

# pvck -d -v /dev/md5
Scanning /dev/md5
Incorrect metadata area header checksum
Found label on /dev/md5, sector 1, type=LVM2 
Found text metadata area: offset=4096, size=193024
Incorrect metadata area header checksum

Finally i founded that it’s possible to make backups of LVM metadata and restore it when needed, but i think that i had only broken LVM with broken metadata.
It’s hard to describe how happy I was when I found that by default LVM create backups of metadata when you make any changes. I found it into /etc/lvm/backup dir, after that recovery become easy task, first i recreate physical volume:

pvcreate -u b3Lk2a-pydG-Vhf3-DSEJ-9b84-RLm9-UEr6r3 --restorefile /etc/lvm/backup/vg-320 /dev/md5

UUID can be founded in pv section into metadata file:

 physical_volumes {
 
 pv0 {
 id = "<strong>b3Lk2a-pydG-Vhf3-DSEJ-9b84-RLm9-UEr6r3</strong>"
 device = "/dev/md5" # Hint only

Next i restored volume group:

vgcfgrestore -f /etc/lvm/backup/vg-320 vg-320

After that logical volumes became visible:

# lvs
 LV VG Attr LSize Pool Origin Data% Move Log Copy% Convert
 root vg-320 -wi-a--- 15.00g 
 swap vg-320 -wi-a--- 1.00g 
 var vg-320 -wi-ao-- 200.00g 
 zoneminder vg-320 -wi-a--- 15.00g

After reinitialization with vgscan -v && vgchange -ay commands, volume groups ready for fsck.

Simple OpenVPN profile generator

Few month ago i learned that OpenVPN support profiles. Before that i generate config for every client, create keys and certs with easy-rsa, tar it’s all together and put on client. Now i can create profile that will contain all necessary keys, certs and config in one file, so i write simple script that generate .ovpn profile for new client.
Generated .ovpn profile can be imported from sd card in Android, via iTunes or email in iOS, or just type `openvpn your_new_profile.ovpn` at PC.
Prerequisites: configured easy-rsa (`pkitool clientname` must produce cert and key for client).
You must customize config part for your server, it is possible to fetch data from server config file, but i’m too lazy to modify script for it.
There is it:

#!/bin/bash
#Dir where easy-rsa is placed
EASY_RSA_DIR="/etc/ssl/easy-rsa"
KEYS_DIR="$EASY_RSA_DIR/keys"
# Dir where profiles will be placed
OVPN_PATH="/root/ovpn"
REMOTE="your.server port"
 
 
if [ -z "$1" ]
then 
        echo -n "Enter new client common name (CN): "
        read -e CN
else
        CN=$1
fi
 
 
if [ -z "$CN" ]
        then echo "You must provide a CN."
        exit
fi
 
cd $EASY_RSA_DIR
if [ -f $KEYS_DIR/$CN.crt ]
then 
        echo "Certificate with the CN $CN already exists!"
        echo " $KEYS_DIR/$CN.crt"
else
source ./vars > /dev/null
./pkitool $CN
fi
 
cat > $OVPN_PATH/${CN}.ovpn << END
client
dev tun
resolv-retry infinite
nobind
persist-key
persist-tun
verb 1
comp-lzo
proto tcp
remote $REMOTE
 
<ca>
`cat $KEYS_DIR/ca.crt`
</ca>
 
<cert>
`sed -n '/BEGIN/,$p' $KEYS_DIR/${CN}.crt`
</cert>
 
<key>
`cat $KEYS_DIR/${CN}.key`
</key>
END

Zram

Few months ago, i tried very cool feature called ‘zram’. It is linux kernel module that allow to create compressed block devices into memory, it can be used for creating compressed fs in ram  (/tmp for example) or for swap.
May be you think, that in context of swap, it is dumb to keeping  memory pages in memory when OS need that memory. =) But compress and store pages in memory is faster than write it onto disk, in most cases memory pages can be heavily compressed, that will help OS to free RAM, if you have SSD it will save life of your disk, also you can continue using swap on disk. If you want to keep you swap partition on-line, you must give higher priority for swap in zram, when zram will full, OS will started to using swap on disk.

I used that init.d script for debian, but i changed it to use not  a whole RAM for zram devices, but half of all memory (in worst case, when pages can not be compressed, zram will use only half of my memory). If you want to do same modification, just change echo $((mem_total / num_cpus )) to echo $((mem_total / num_cpus / 2)) in that script.
Without modifications this script will slice you memory by number of CPU core in your system, create swaps on that slices and attach it to your system with priority 100 (usualy swap partitions have priority -1).
I made simple test of compression ratio for zram:
Detached one of my swaps:

$ sudo swapoff /dev/zram3

Created core file of iceweasel process and wrote it into zram:

$ pgrep -lf icewea
3375 sh -c /usr/bin/iceweasel
3376 /usr/bin/iceweasel
$ gcore 3376
[Thread debugging using libthread_db enabled]
[New Thread 0x7f7c0b9fd700 (LWP 8455)]
...blablabla...
0x00007f7c62a57c13 in poll () from /lib/libc.so.6
Saved corefile core.3376
$ sudo dd if=./core.3376 of=/dev/zram3
dd: writing to `/dev/zram3': No space left on device
2027297+0 records in
2027296+0 records out
1037975552 bytes (1,0 GB) copied, 6,79003 s, 153 MB/s

Core file does not fit completely into zram device, but it is dose not mater, let’s look at compression ratio:

$ cd /sys/block
$ echo `cat ./zram3/orig_data_size`/`cat ./zram3/compr_data_size`|bc
2.68475926964795164955

So, in most cases zram has compress ratio more than 2.5.
Huh, i think it is pretty cool.

Zoneminder jitter

After several years of torture with easycap i realize that it is time to change capture device. I found that other usb capture device that supported by linux cost to high, also i can not use PCI or full height PCI-e devices because of mATX form factor of my server.  Suddenly i found ImpactVCB 1381, it is what i wanted to found, it is supported by linux, PCI-e and has half height bracket.
Before i did not try it card i did not think, that it is can be so much difference in image quality between two cards. Unfortunately i do not have sample with  easycap, but you can trust me, difference is enough to throw easycap.
As always there is a fly in the ointment, zoneminder or haupage driver has bug and captured image sometimes jittering, it is looks like that:
Zoneminder jitter

I preferred to think, that it is bug in zoneminder, because i did not seen same issue when i captured video with mencoder.
Will hope it will be fixed in future releases.

You IP

Since the idiots in the Russian government passed a law similar to ‘SOPA’ i started to modify routing scheme at my home. Many times i used internet.ya.ru to determine my current outgoing IP address, but i wanted to use more minimalistic tool for this purpose. So i created my own tool with blackjack and hookers, there it is: https://ivanbayan.com/uip.php i using different routes for TLS and http traffic, so it is also available there  https://ivanbayan.com/uip.php.
This script produce simple image with you outgoing ip:

You ip

How to fix ‘Timezone database is corrupt – this should *never* happen!’

Today i upgraded to wheezy. When i entered my blog i observed that it does not work anymore. I looked into logs and found next errors:

[26-Jun-2013 12:59:41 UTC] PHP Fatal error:  date(): Timezone database is corrupt - 
this should *never* happen! in ...
[26-Jun-2013 12:59:49 UTC] PHP Fatal error:  strtotime(): Timezone database is 
corrupt - this should *never* happen! in /html/wp-includes/functions.php on line 33...

After a little investigation I discovered that happens when you use php in chroot enviroment (i using php5-fpm with chroot, so it is my case). I tried to copy /usr/share/zoneinfo in chroot environment with parent dir structure and correct permissions, but nothing change. Somewhere i read that it problem can happen in debian, because maintainers of php packages, patch source files, the solution – is to install tzdatadb:

apt-get install php-pear php5-dev
pecl install timezonedb
echo 'extension=timezonedb.so'> /etc/php5/mods-available/timezonedb.ini
ln -sf /etc/php5/mods-available/timezonedb.ini /etc/php5/conf.d/30-timezonedb.ini
service php5-fpm restart

After that all work like a charm.

PS

strings /usr/sbin/php5-fpm|grep Quake| head -n8
Quake I save: ddm4 East side invertationa
Quake I save: d7 The incinerator plant
Quake I save: d12 Takahiro laboratories
Quake I save: e1m1 The slipgate complex
Quake I save: e1m2 Castle of the damned
Quake I save: e2m6 The dismal oubliette
Quake I save: e3m4 Satan's dark delight
Quake I save: e4m2 The tower of despair

Easter egg?

Kali linux on LiveUSB with working persistent partition

Few days ago i wanted to make liveusb with kali linux (i had backtrack before). I used this guide to install kali, but i observed, that persistence partition does not work. There is partitions on my usb drive:
Kali - old partition table
When init script found persistent partition and tried to mount  their return error “mount: mounting /dev/sdaX on /root/lib/live/mount/persistence/sdaX failed: Device or resource busy”.
I think this happened because official guide suggest to write iso9660 image on usb drive, and init script think that it is cd drive and mount whole usb device, not a partition where iso placed. This i found in boot.log:

There you can see, that after kali boot, usb drive (sda) still mounted, and i can not mount second partition:
Kali1
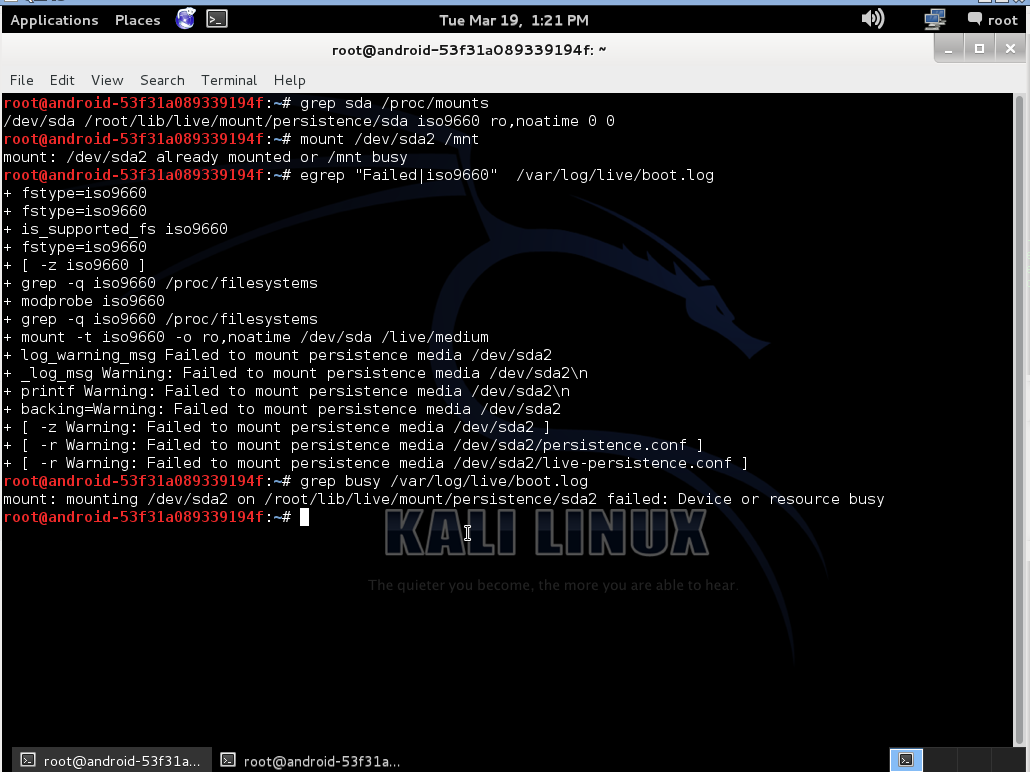
After that whole usb drive is busy.  I attached boot.log to this post with enabled debug, may be it will help someone to fix that.

I decided to make bootable usb disk instead of flashing iso on it. For doing that i used extlinux and original kali iso file.
First i create 2 partitions on usb drive, one for kali and second for persistent files:

Kali2

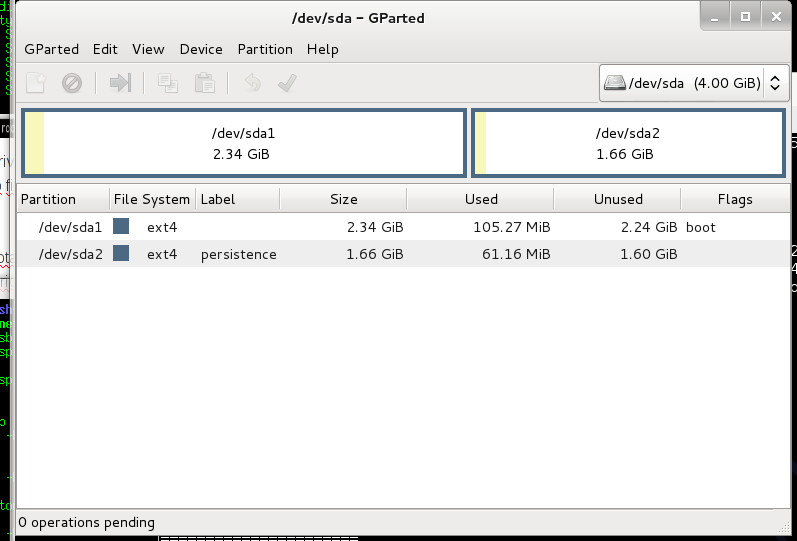
Do not forget to set bootable flag on first partition and correct label for persistent paririon.
After that, install mbr from extlinux:

$ dd if=/usr/lib/extlinux/mbr.bin of=/dev/sda
0+1 records in
0+1 records out
440 bytes (440 B) copied, 0.00126658 s, 347 kB/s

Copy kali linux on first partition:

$ mkdir /mnt/sr0 /mnt/kali
$ mount /dev/sr0 /mnt/sr0/
mount: block device /dev/sr0 is write-protected, mounting read-only
$ mount /dev/sda1 /mnt/kali/
$ rsync -a /mnt/sr0/* /mnt/kali

Also i modify boot menu and add entry with persistence boot option at live.cfg:

label live-686-pae-persistence
menu label ^Live persistence (686-pae)
menu default
linux /live/vmlinuz
initrd /live/initrd.img
append boot=live noconfig=sudo username=root hostname=android-53f31a089339194f persistence

After that you need to rename isolinux.cfg to extlinux.conf and install extlinux:

$ cp /mnt/kali/isolinux/isolinux.cfg /mnt/kali/isolinux/extlinux.conf
$ extlinux --install /mnt/kali/isolinux/
/mnt/kali/isolinux/ is device /dev/sda1

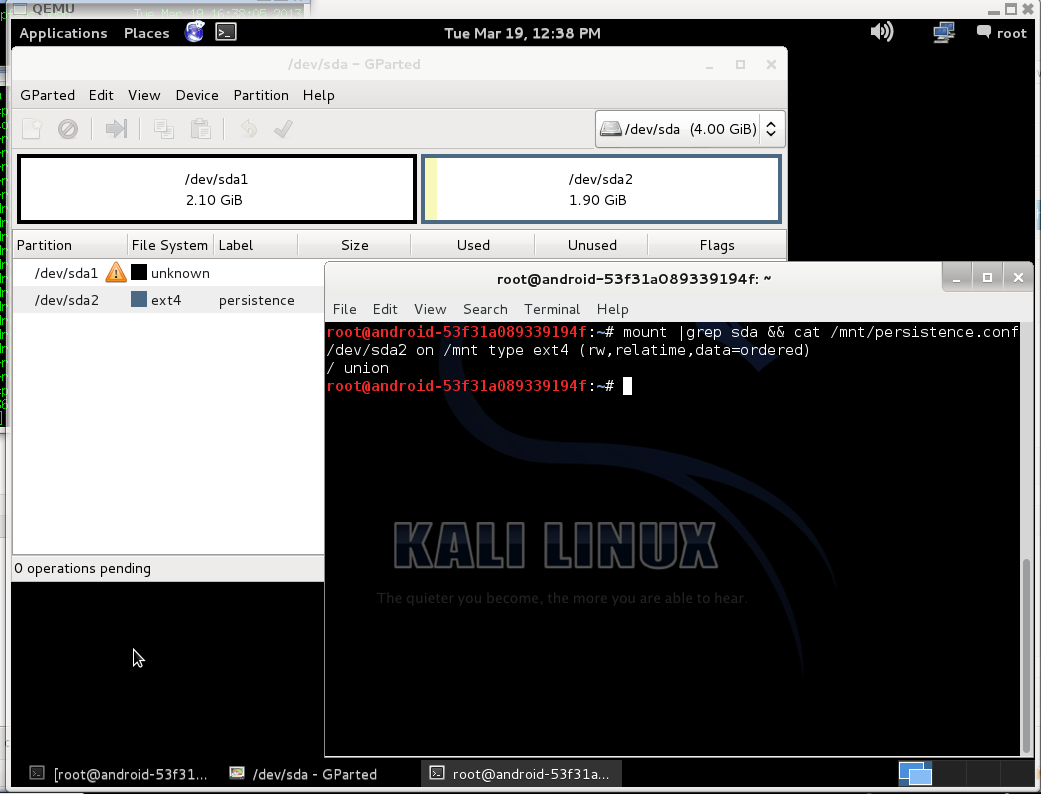
Mount persistence partition and create config:

$ mkdir /mnt/persist
$ mount /dev/sda2 /mnt/persist/
$ echo "/ union" > /mnt/persist/persistence.conf

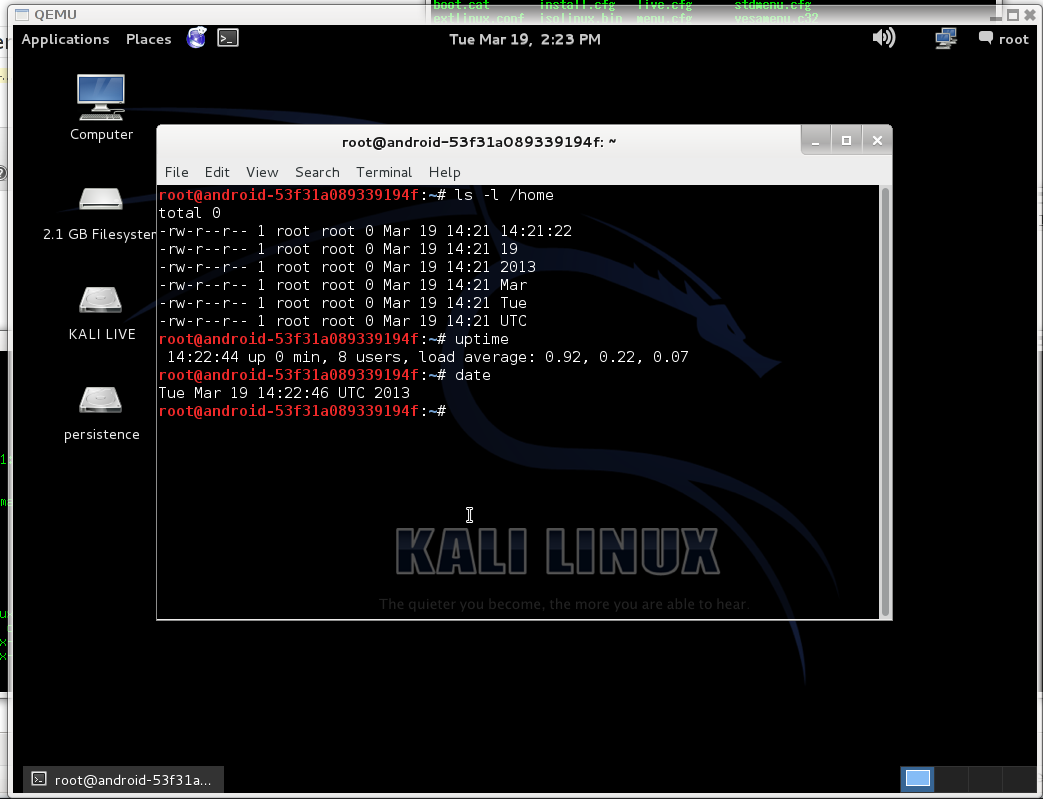
After that you can reboot and check, that persistent partition work.
Kali3

Split and encode FLAC/CUE to mp3/ogg in one run.

flacsFew days ago i  needed to split and encode one flac file to mp3. I found few solutions, one of them only split flac file, other encode flac to mp3, but no one do not do it in one run.
So, i wrote script, you must specify flac and cue/toc files, after that script will convert flac file to group of mp3 or ogg files and will add tags.
To get this script work, you need to install next packages “cuetools”, “shntool”, “id3v2”, “vorbis-tools” and “lame”.
You will not found lame in standard repositories of squeeze, but you can install it from backports or from debian multimedia repository (all packages available in modern debian based distribution, at least I tested it in debian 8-10).
Usage: flac2mp3 -f /path/to/flac.flac -s /path/to/cue.cue
Also, you can choose between mp3 or ogg with swich -e mp3 or -e ogg (mp3 will be used by default).

Latest version of script available there: https://gist.github.com/IvanBayan/b8a1e7a1629de20b06ef6dc44843c9fe

#!/bin/bash
 
LAMEOPTS="-b 320 --quiet"
OGGOPTS="-b 320 --quiet"
 
while getopts ":s:f:e:" opt; do
  case $opt in
    f)
      FILE="$OPTARG"
      ;;
    s)
      SPLIT="$OPTARG"
      ;;
    e)
      FMT="$OPTARG"
      ;;
    \?)
      echo "Invalid option: -$OPTARG" >&2
      exit 1
      ;;
    :)
      echo "Option -$OPTARG requires an argument." >&2
      exit 1
      ;;
  esac
done
 
# Set default format to mp3
case ${FMT:="mp3"} in
    mp3|MP3|ogg|OGG)
    ;;
    *)
        echo "Unknown format $FMT" >&2
        exit 1
    ;;
esac
 
# Check both files
if [ ! -f "$FILE" -o ! -f "$SPLIT" ]
then
    echo "You must specify correct flac file and CUE/TOC file." >&2
    exit 1
fi
 
#Get number of tracks
NUMTRACKS=`cueprint -d '%N' "${SPLIT}"`
 
for i in `seq 1 $NUMTRACKS`
do
    # Clear previous obtained variables 
    unset PERFORMER
    unset ALBUM
    unset TITLE
 
    # Set performer, album, track title
    PERFORMER=`cueprint -n $i -t '%p' "${SPLIT}"`
    ALBUM=`cueprint -d '%T' "${SPLIT}"`
    TITLE=`cueprint -n $i -t '%t' "${SPLIT}"`
 
    ## Check perfomer, album and track title
    if [ -z "$PERFORMER" ]
    then
        echo "Track $i: Can not obtain performer from cue, set it to 'Unknown Artist'" >&2
        PERFORMER="Unknown Artist"
    fi
 
    if [ -z "$ALBUM" ]
    then
        echo "Track $i: Can not obtain album from cue, set it to 'Unknown Album'" >&2
        ALBUM="Unknown Album"
    fi
 
    if [ -z "$TITLE" ]
    then
        echo "Track $i: Can not obtain track from cue, set it to 'Track $i'" >&2
        TITLE="Track $i"
    fi
 
    ## End
 
    # Split and encoding files
    echo "Encoding track $i/$NUMTRACKS."
    if [ "$FMT" = "mp3" -o "$FMT" = "MP3" ] 
    then        
        cuebreakpoints "$SPLIT"| shnsplit -q -o "cust ext=mp3 lame  $LAMEOPTS - %f" \
-x $i -O always -a "" -z " - $TITLE" "$FILE"
        OUTPUT=`printf "%.2d - ${TITLE}.mp3" $i`
        id3v2 -T $i -a "$PERFORMER" -A "$ALBUM" -t "$TITLE" "$OUTPUT"
    fi
 
    if [ "$FMT" = "ogg" -o "$FMT" = "OGG" ]
    then
        cuebreakpoints "$SPLIT"|shnsplit -q -o "cust ext=ogg oggenc $OGGOPTS -o %f -" \
-x $i -O always -a "" -z " - $TITLE" "$FILE"
        OUTPUT=`printf "%.2d - ${TITLE}.ogg" $i`
        echo -e "TRACKNUMBER=${i}\nARTIST=${PERFORMER}\nPERFORMER=${PERFORMER}" \
                             "\nALBUM=${ALBUM}\nTITLE=${TITLE}\n"|vorbiscomment "$OUTPUT"
    fi    
 
done

Smart traffic shaping with tcng

An year ago i was set up my own home router based on PC and faced with the necessity of prioritizing network traffic. First i drown small diagram that displayed traffic that i had and priorities that i was will to give to that traffic.

I placed diagram here, but i must warn you, i made this diagram for myself, so it may look ugly for other. I had one channel to internet and few VPN tunnels for personal use. On the diagram i specified sources of possible traffic and assigned different priorities for diffirent types of traffic (from “realtime” — red, till ‘does not care’ – ‘grey’). This diagram helped me to distinguish different types of traffic and to planned how i can construct rules for them.

After that i started to learn how to shape my traffic. First i found that i can do it only by ‘tc’ from iproute package, i found this method is too complex if i will wanted to remember what tc rules do in future. Also at this stage i select HTB discipline for shaping in future.

Next i tried HTB.init script and found that metod too ugly.

I started to search more ‘high-level’ method and found tcng, it is just a brilliant. It is special language interpreter, that allow you to write how you want to shape your traffic in ‘script’ manner. First, i was worried, because last release  of tcng was in 2004 year, but later i found, that tcng work perfect.

Before i started to learn tcng i do not know, that you can use tc in very different manner. For example you can use only tc for prioritizing traffic by port and protocol, or by bits in field of the packet. So, let’s look at simple example:

dev ppp0 {
  egress {
    class ( <$interactive> )  if tcp_dport == 22;
    class ( <$medium> )  if tcp_dport == 80 || tcp_dport == 443;
    class ( <$bulk> )  if tcp_dport == 21;
    class ( <$default> ) ;
 
    htb () {
      $interactive  = class ( rate 64kbps, ceil 128kbps ) {
                        sfq ( perturb 10s ); }
      $medium       = class ( rate 128kbps, ceil 128kbps ) {
                        sfq ( perturb 10s ); }
      $bulk         = class ( rate 256kbps, ceil 512kbps ) {
                        sfq ( perturb 10s ); }
      $default       = class ( rate 256kbps, ceil 512kbps ) {
                        sfq ( perturb 10s ); }
    }
  }
}

I think, even if you do not know anything about tc and about traffic shaping at all, when you will look on this example, you can easily suggest what’s happening there. I writed before, that i found clear tc syntaxis too complex, tcng convert rules writed on his own language to tc syntaxis, let’s look how it will look after tcng ‘compile’ this rules:

tc qdisc add dev ppp0 handle 1:0 root dsmark indices 8 default_index 0
tc qdisc add dev ppp0 handle 2:0 parent 1:0 htb
tc class add dev ppp0 parent 2:0 classid 2:1 htb rate 8000bps ceil 16000bps
tc qdisc add dev ppp0 handle 3:0 parent 2:1 sfq perturb 10
tc class add dev ppp0 parent 2:0 classid 2:2 htb rate 16000bps ceil 16000bps
tc qdisc add dev ppp0 handle 4:0 parent 2:2 sfq perturb 10
tc class add dev ppp0 parent 2:0 classid 2:3 htb rate 32000bps ceil 64000bps
tc qdisc add dev ppp0 handle 5:0 parent 2:3 sfq perturb 10
tc class add dev ppp0 parent 2:0 classid 2:4 htb rate 32000bps ceil 64000bps
tc qdisc add dev ppp0 handle 6:0 parent 2:4 sfq perturb 10
tc filter add dev ppp0 parent 2:0 protocol all prio 1 tcindex mask 0x7 shift 0
tc filter add dev ppp0 parent 2:0 protocol all prio 1 handle 4 tcindex classid 2:4
tc filter add dev ppp0 parent 2:0 protocol all prio 1 handle 3 tcindex classid 2:3
tc filter add dev ppp0 parent 2:0 protocol all prio 1 handle 2 tcindex classid 2:2
tc filter add dev ppp0 parent 2:0 protocol all prio 1 handle 1 tcindex classid 2:1
tc filter add dev ppp0 parent 1:0 protocol all prio 1 handle 1:0:0 u32 divisor 1
tc filter add dev ppp0 parent 1:0 protocol all prio 1 u32 match u8 0x6 0xff at 9 offset at 0 mask 0f00 shift 6 eat link 1:0:0
tc filter add dev ppp0 parent 1:0 protocol all prio 1 handle 1:0:1 u32 ht 1:0:0 match u16 0x16 0xffff at 2 classid 1:1
tc filter add dev ppp0 parent 1:0 protocol all prio 1 handle 2:0:0 u32 divisor 1
tc filter add dev ppp0 parent 1:0 protocol all prio 1 u32 match u8 0x6 0xff at 9 offset at 0 mask 0f00 shift 6 eat link 2:0:0
tc filter add dev ppp0 parent 1:0 protocol all prio 1 handle 2:0:1 u32 ht 2:0:0 match u16 0x50 0xffff at 2 classid 1:2
tc filter add dev ppp0 parent 1:0 protocol all prio 1 handle 3:0:0 u32 divisor 1
tc filter add dev ppp0 parent 1:0 protocol all prio 1 u32 match u8 0x6 0xff at 9 offset at 0 mask 0f00 shift 6 eat link 3:0:0
tc filter add dev ppp0 parent 1:0 protocol all prio 1 handle 3:0:1 u32 ht 3:0:0 match u16 0x1bb 0xffff at 2 classid 1:2
tc filter add dev ppp0 parent 1:0 protocol all prio 1 handle 4:0:0 u32 divisor 1
tc filter add dev ppp0 parent 1:0 protocol all prio 1 u32 match u8 0x6 0xff at 9 offset at 0 mask 0f00 shift 6 eat link 4:0:0
tc filter add dev ppp0 parent 1:0 protocol all prio 1 handle 4:0:1 u32 ht 4:0:0 match u16 0x15 0xffff at 2 classid 1:3

Huh now it is not so simple as before.

OK, let’s talk about few things that you need to understand if you do not want to read theory about traffic shaping and about tc.
First, all that i will told, valid only to network  and transport level of tcp/ip stack, it can be valid for other level/situation, but you can found exceptions.
Second, you can not control directly the speed at which the remote host will send you the data, you can control speed which you will send the data or speed which you will recieve the data. I.e. if you have 10 Mbit channel, and remote host sending something to you at speed 10 Mbit/s, your channel will be flooded by remote host.
If we talk about tcp sockets, then you can indirectly control speed, you can recieve packets at 5Mbit/s and tcp protocol must throttle speed which remote host sending the data. If we talk about UDP, you can not do anything on network/transport level, exept shutting down of your interface. =)
So, why i told about that, in most cases when you shaping traffic in linux, you shaping outbound traffic. It is effective, exept situation when inbound bandwidth flooded which udp or which special forged packets ( if your under tcp syn flood attack, for example). When i wrote rules, i wrote it for outound traffic. You can try to control inbound traffic by IFB devices, but it is another story.
All rules and disciplines directly or indirectly bound to on of the network interface
Third important thing, in linux exists few diffirent disciplines for traffic shaping (you need to read tc manual, if you want to know more), i prefer HTB for my purposes. When you use HTB, you must classify traffic, all traffic that will not be classified, will go to the default class.

Huh, i read again what i wrote and now thinking that it look not so simple if you does not read theory about traffic shaping in linux, anyway if you does not understand what about i talking, you can read manual for tc and LARTC or you free to experiment and look what will happen. =)

After i learned tcng, i wrote complete rules for shaping traffic on ppp0, but when i tried to compile rules, i noticed that tcng use amount of cpu and did not response, i thinked that it is a bug, but after few minutes i got near 30 000 lines of tc commands. It happened, because i began using tcng  without understanding how they compile their rules. I give a simple example what happened:

#include "ports.tc"
 
dev ppp0 {
    egress {
        /* all of our classification happens here */
        class ( <$test> )  if tcp_sport > 1024 && tcp_dport < 1024 ||                            udp_sport > 1024 && udp_dport > 1024;
        class ( <$default> );
        /* all of our queues are added here */
        htb () {
            $test   = class ( rate 64kbps, ceil 128kbps ) {
                sfq ( perturb 10s ); }
            $default       = class ( rate 256kbps, ceil 512kbps ) {
                sfq ( perturb 10s ); }
        }
    }
}

This is just example, what will happened if you will try to compile it? Let’s see:

$ tcng /tmp/tcngtest|wc -l
732

You will can seen by yourself how looks result. In short when tcng compile rules, they can not use logical operations like destination port > 1024, instead of that they use bit maching by offset in package, as result you will got hundred rules that will containt bits, bit masks, offsets etc. I do not have my old rules for demonstration how exactly i had near 30k lines, but i will show how i solve this problem by iptables and tcng.

Because i can not use complex rules of packet classification in tcng, i used iptables to mark packets by same rules and simple rules in tcng for shaping by marks. You can learn about mark in iptables manual, as i remember, iptables can mark packets in network stack of OS, this mark visible locally, but will invisible for other hosts.
I slightly modified classification that you can see in diagram, i added additional classes and now traffic divided into realtime, high priority, middle pirority low latency, mid priority, low priority and default.
Also i want to explain rule for low priority traffic, first task is mark as low priority p2p networks, there is two way, use l7 inspection or use dumb rules based on network/transport layer. L7 inspection give low false positive error rates, but slow. Dumb rules give high false positive error rates, but fast. For l7 inspection you can use opendpi, but i prefer second solution. I classify all traffic from unprivileged ports to all  unprivileged as low priority traffic. Anyway, if you have something important that send data from unprivileged to unprivileged port, you can specify additional rules for this traffic (if your know ports).

Ok, let’s look on tcng rules, i created rules only for my internet connection, i connected over pppoe, so i placed next script in /etc/ppp/ip-up.d/qos:

#!/bin/sh
if [ ! -z $PPP_IFACE ]
then
  if [ -f /etc/tcng/${CALL_FILE}.tc ]
  then
    /bin/sed "s/PPP_IFACE/${PPP_IFACE}/" /etc/tcng/${CALL_FILE}.tc|/usr/bin/tcng -r|/bin/bash
  fi
fi

In /etc/tcng/dsl-provider.tc i put my rules, every time when i ‘call’ dsl-provider this script executing. Name of PPP interface can vary, so instead of interface name i put ‘PPP_IFACE’ into rules. When ppp connection established, script change marker to actual interface name, compile rules and execute it.

There is my rules:

#include "fields.tc"
#include "ports.tc"
 
dev PPP_IFACE {
  egress {
    class( <$realtime> ) if meta_nfmark == 0x10;
    class( <$high> ) if meta_nfmark == 0x15;
    class( <$mid_lowlatency> ) if meta_nfmark == 0x20;
    class( <$mid_noname> ) if meta_nfmark == 0x25;
    class( <$lowp> ) if meta_nfmark == 0x30;
    class( <$default> ) if 1; //default
    htb(quantum 1500B) {
      class( rate 100Mbps, ceil 100Mbps ) {
        class( prio 1, rate 2Mbps, ceil 100Mbps ) {
          $realtime = class( prio 1, rate 1Mbps, ceil 100Mbps ) { sfq; }
          $high = class( prio 2, rate 1Mbps, ceil 100Mbps ) { sfq; }
        };
        class( prio 2, rate 2Mbps, ceil 100Mbps, quantum 1250B ) {
          $mid_lowlatency = class( prio 1, rate 1Mbps, ceil 100Mbps ) { sfq; }
          $mid_noname = class( prio 2, rate 1Mbps, ceil 100Mbps ) { sfq; }
        };
        $lowp = class( prio 8, rate 1Mbps, ceil 100Mbps ) { sfq; };
        $default = class( prio 3, rate 1Mbps, ceil 100Mbps ) { sfq; };
      }
    }
  }
}

Pay attention, default class have higher priority than low priority. There i have different class names, but i think it is not a big problem for understanding idea of rules. Next we will talk about packets marking. if you want to mark packet in iptables, you need to use `-J MARK –set-mark=MARK_VALUE`, if you need to match marked packets in tcng, you must use `meta_nfmark` directive.  As i remember, you need to place mark rules into `mangle` table `PREROUTING` chain, otherwise this will not work with `tc`. I create `QOS` chain into `mangle` table and add `-j QOS` rule into `PREROUTING` chain, there is part of iptables-save dump:

-A POSTROUTING -o ppp0 -j QOS 
-A QOS -p icmp -m mark --mark 0x0 -m comment --comment "MARK all icmp traffic as realtime" -j MARK --set-mark 0x10/0xffffffff 
-A QOS -p tcp -m mark --mark 0x0 -m tcp --dport 53 -m comment --comment "MARK tcp DNS queries as realtime" -j MARK --set-mark 0x10/0xffffffff 
-A QOS -p udp -m mark --mark 0x0 -m udp --dport 53 -m comment --comment "MARK udp DNS queries as realtime" -j MARK --set-mark 0x10/0xffffffff 
-A QOS -p udp -m mark --mark 0x0 -m udp --dport 123 -m comment --comment "MARK udp NTP queries as realtime" -j MARK --set-mark 0x10/0xffffffff 
-A QOS -p tcp -m mark --mark 0x0 -m tcp --dport 123 -m comment --comment "MARK tcp NTP queries as realtime" -j MARK --set-mark 0x10/0xffffffff 
-A QOS -m mark --mark 0x0 -m length --length 0:128 -m comment --comment "MARK all small packets as realtime" -j MARK --set-mark 0x10/0xffffffff 
-A QOS -p tcp -m mark --mark 0x0 -m multiport --dports 22,5190 -m length --length 0:1500 -m comment --comment "MARK all small SSH and ICQ packets as high priority" -j MARK --set-mark 0x15/0xffffffff 
-A QOS -p tcp -m mark --mark 0x0 -m multiport --dports 80,443 -m comment --comment "MARK all HTTP traffic as medium interactive priority" -j MARK --set-mark 0x20/0xffffffff 
-A QOS -p tcp -m mark --mark 0x0 -m multiport --dports 143,220,993 -m comment --comment "MARK  IMAP traffic as medium interactive priority" -j MARK --set-mark 0x20/0xffffffff 
-A QOS -p tcp -m mark --mark 0x0 -m multiport --dports 110,995 -m comment --comment "MARK POP3 traffic as medium priority" -j MARK --set-mark 0x25/0xffffffff 
-A QOS -p tcp -m mark --mark 0x0 -m multiport --dports 25,465 -m comment --comment "MARK SMTP traffic as medium priority" -j MARK --set-mark 0x25/0xffffffff 
-A QOS -p tcp -m mark --mark 0x0 -m tcp --sport 10000 -m comment --comment "MARK outgoing OpenVPN as medium priority" -j MARK --set-mark 0x25/0xffffffff 
-A QOS -p tcp -m mark --mark 0x0 -m tcp --sport 1723 -m comment --comment "MARK outgoing pptp as medium priority" -j MARK --set-mark 0x25/0xffffffff 
-A QOS -p tcp -m mark --mark 0x0 -m multiport --sports 80,6080 -m comment --comment "MARK outgoing HTTP as medium priority" -j MARK --set-mark 0x25/0xffffffff 
-A QOS -p tcp -m mark --mark 0x0 -m multiport --dports 1024:65535 -m multiport --sports 1024:65535 -m comment --comment "MARK low priority TCP traffic" -j MARK --set-mark 0x50/0xffffffff 
-A QOS -p udp -m mark --mark 0x0 -m multiport --dports 1024:65535 -m multiport --sports 1024:65535 -m comment --comment "MARK low priority UDP traffic" -j MARK --set-mark 0x50/0xffffffff

I wrote rules with comments, so it is easy to understand. Also, now i noticed, that i must add this rules from script that executed when pppoe connection established, because i does not know name of ppp interface before connection will be established.

In conclusion i want to say, i tried just to show that tcng is very useful tool, it will help you to write clear rules for traffic shaping. Anyway, it can not substitute knowleges about how work traffic shaping in linux. I highly reccomend to read LARTC and manual for `tc` before you going to use `tcng`.

Failsafe zoneminder with gluster and geo-replication.

Near year ago i configured zoneminder for monitoring my approach. But i got one problem, host that running zoneminder placed in same approach, so, if it will be stolen, it will be stolen with recordings. I spend a lot of time while choosing solution to organize replication on remote server. Most solution that i found work in “packet” mode, they start replication once in NN sec or after accumulating a certain number of events and usually use rsync. Rsync allow to reduce traffic usage, but increase time between event when new frame will be wrote on disk and event when frame will be wrote on remote side. In this situation every second counts, so I thought that solutions like “unison”, “inosync”, “csync2”, “lsyncd” not applicable.

I tried to use drbd, but get few problems. First – i do not have separate partition on host and can not shrink existing partitions to get new. I tried it with loopback devices, but drbd have deadlock bug when used with loopback. This solution work near two days after deadlock occurs, you can not read content of mounted fs or unmount it and only one solution to fix it that i found – reboot. Second problem – “split brain” situation, when master host restart. I did not spent time to found solution because all ready had first problem. May be it can be fixed with split-brain handlers script or with “heartbeat”. Drbd has great write speed in asynchronous mode and has small overhead, so, may be in another situation i will choose drbd.

Next what i tried was “glusterfs”, first i tried glusterfs 3.0. It was easily to configure it, and glusterfs was worked, but very slow. For good performance glusterfs need short latency between hosts. It useful for local networks but completely useless for hosts connected over slow links. Also glusterfs 3.0 did not have asynchronous write like in drbd. I temporarily thrown searching for solutions, but after a while in release notes for glusterfs 3.2 i found that gluster got “geo-replication“. First i think that this it what i need and before has understood (see conclusion) how it work i started to configure it.

If you will have troubles with configuration, installation  here you can find manual.
For Debian, first that you need is to add backports repository on host with zonemnider and on hosts where you planned to replicate data:

$ echo 'deb http://backports.debian.org/debian-backports squeeze-backports \
main contrib non-free' >> /etc/apt/sources.list
$ apt-get update
$ apt-get install glusterfs-server

After that you must open ports for gluster on all hosts where you want to use it:

$ iptables -A INPUT -m tcp -p tcp --dport 24007:24047 -j ACCEPT 
$ iptables -A INPUT -m tcp -p tcp --dport 111 -j ACCEPT 
$ iptables -A INPUT -m udp -p udp --dport 111 -j ACCEPT 
$ iptables -A INPUT -m tcp -p tcp --dport 38465:38467 -j ACCEPT

If you do not planned to use glusterfs over NFS (as i) you can skip last rule.
After ports will opened, gluster installed and service running you need to add gluster peers. For example you run zoneminder on host “zhost” and want to replicate it on host “rhost” (do not forget add hosts in /etc/hosts on both sides).  Run “gluster” and add peer (here and below gluster commands must to be executed on master host, i.e. on zhost):

$ gluster
gluster> peer probe rhost

Let’s check it:

gluster> peer status
Number of Peers: 1
 
Hostname: rhost
Uuid: 5e95020c-9550-4c8c-bc73-c9a120a9e96e
State: Peer in Cluster (Connected)

Next  necessary to create volumes on both hosts, do not forget to create directories where gluster will save their files. For examples you planned to use “/var/spool/glusterfs”:

gluster> volume create zoneminder transport tcp zhost:/var/spool/glusterfs
Creation of volume zoneminder has been successful. Please start the volume to access data.
gluster> volume create zoneminder_rep transport tcp rhost:/var/spool/glusterfs
Creation of volume zoneminder_rep has been successful. Please start the volume to access data.
gluster> volume start zoneminder
Starting volume zoneminder has been successfu
gluster> volume start zoneminder_rep
Starting volume zoneminder_rep has been successfu

After that you must configure geo-replication:

gluster&gt; volume geo-replication zoneminder gluster://rhost:zoneminder_rep start
Starting geo-replication session between zoneminder &amp; gluster://rhost:zoneminder_rep has been successful

And check that it is work:

gluster> volume geo-replication status
MASTER               SLAVE                                              STATUS    
--------------------------------------------------------------------------------
zoneminder           gluster://rhost:zoneminder_rep           starting...
gluster> volume geo-replication status
MASTER               SLAVE                                              STATUS    
--------------------------------------------------------------------------------
zoneminder           gluster://rhost:zoneminder_rep           OK

Also i made next configurations:

gluster> volume geo-replication zoneminder gluster://192.168.107.120:zoneminder_rep  config sync-jobs 4
geo-replication config updated successfully
gluster> volume geo-replication zoneminder gluster://192.168.107.120:zoneminder_rep  config timeout 120
geo-replication config updated successfully
gluster> volume set zoneminder nfs.disable on
Set volume successful
gluster> volume set zoneminder_rep nfs.disable on
Set volume successful
gluster> volume set zoneminder nfs.export-volumes off
Set volume successful
gluster> volume set zoneminder_rep nfs.export-volumes off
Set volume successful
gluster> volume set zoneminder performance.stat-prefetch off
Set volume successful
gluster> volume set zoneminder_rep performance.stat-prefetch off
Set volume successful

I disabled nfs because i did not planned to use gluster volumes over nfs, also i disabled prefetch because they produce next error on geo-ip modules:

E [stat-prefetch.c:695:sp_remove_caches_from_all_fds_opened] (-->/usr/lib/glusterfs/3.2.7/xlator/mount/fuse.so(fuse_setattr_resume+0x1b0) [0x7f2006ba8ed0] (-->/usr/lib/glusterfs/3.2.7/xlator/debug/io-stats.so
(io_stats_setattr+0x14f) [0x7f200467db8f] (-->/usr/lib/glusterfs/3.2.7/xlator/performance/stat-prefetch.so(sp_setattr+0x7c) [0x7f200489c99c]))) 0-zoneminder_rep-stat-prefetch: invalid argument: inode

In conclusion i must to say, that it is not a solution that i looked for, because as it turned out  gluster use rsync for geo-replication. Pros of this solution: it is work and easy to setup. Cons it is use rsync. Also i expected that debian squeeze can not mount gluster volumes in boot sequence, i tried to modify /etc/init.d/mountnfs.sh but without result, so i just add mount command in zoneminder start script.

PS
echo ‘cyclope:zoneminder      /var/cache/zoneminder   glusterfs       defaults        0       0’ >> /etc/fstab
And add ‘mount /var/cache/zoneminder’ in start section of /etc/init.d/zoneminder

PPS
Do not forget to stope zoneminder and copy content of /var/cache/zoneminder on new partition before using it.