I have a feeling that I might be creating a problem only to heroically solve it, but here’s the issue: Xray and the subscription service listen on different ports. If VLESS-Reality is used, the host should mimic a legitimate third-party host as closely as possible. Therefore, having an HTTPS service with a different certificate on a non-standard port looks suspicious. Possible options include:
- SNI Shunting: (I haven’t tried this yet. I’ve seen examples using Nginx, but it’s unclear how to make Nginx appear as a legitimate third-party host and make it use the same certificate and more importantly how to get key for it? So it should be some point of transport proxying.)
- Using a Second IP on the Server
I’ve tried searching for examples or documentation, but without much success.
The most promising idea that came to mind: why not use a second server to proxy requests for the subscription service? The downside is the cost of maintaining a second VPS. However, the advantage is that the services are decoupled. If the proxy host gets blocked, the subscription service host remains functional and can be repointed to another server.
In this setup, the subscription service would listen on a port opened in the firewall only for the second server (or the servers could connect via a VPN using a private address). On the second server (assuming Nginx is used), you’d expect to set up a location block with proxy_pass, right? Wrong.
The subscription link looks like this: https://<subscription host>:<subscription port>/<uri>/<subscription>
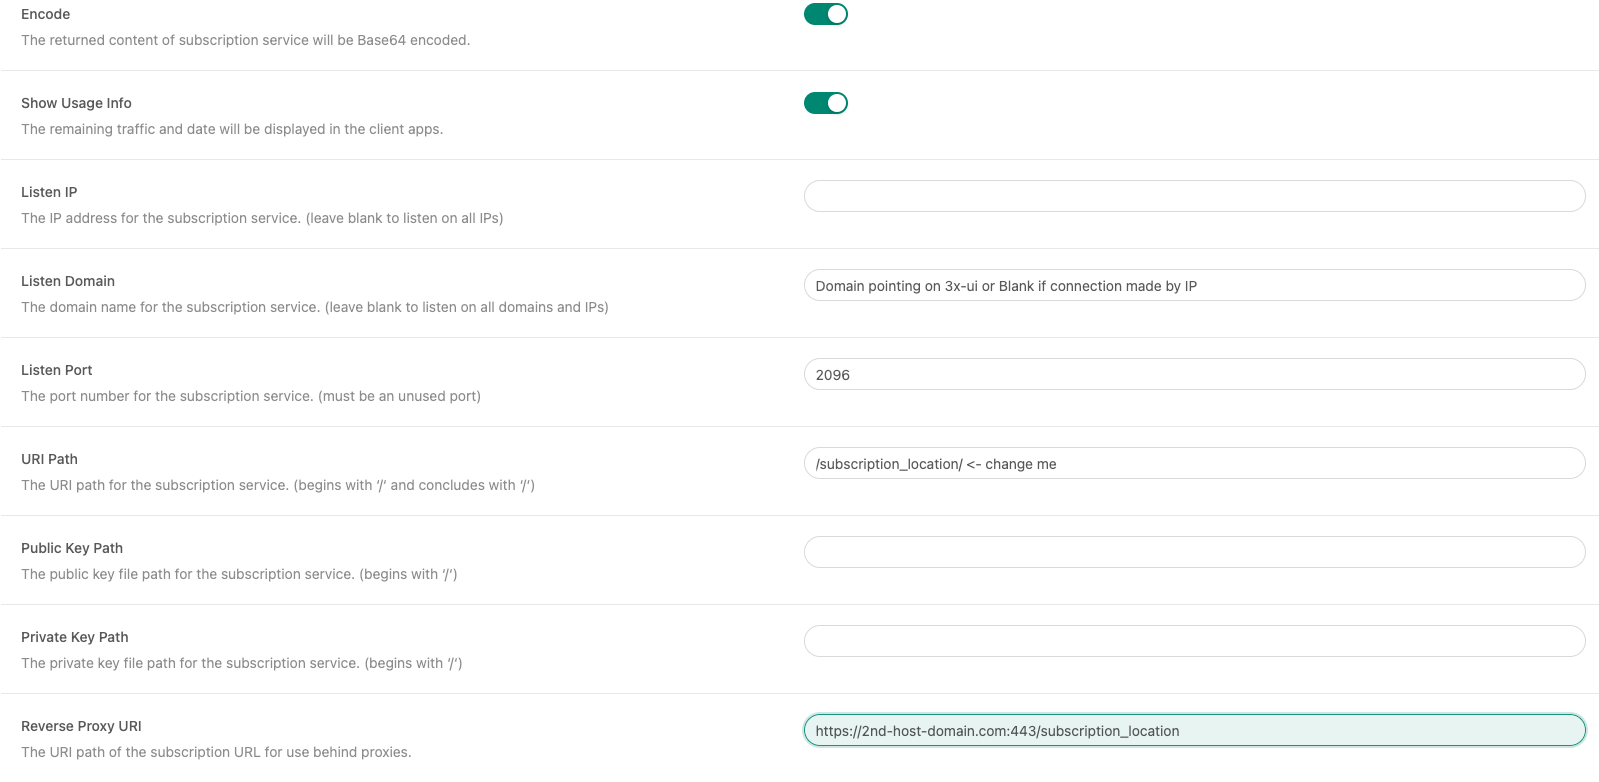
When 3x-ui generates the link, it uses the Listen Domain, Listen Port, or Reverse Proxy URI. The solution seems obvious: set the Reverse Proxy URI, and… here’s where things start getting strange.
The subscription service returns a list of URLs with parameters for connecting to inbounds. For example, in the case of VLESS, the format is as follows: vless://<someuuid>@<address>:<subscription port>?parameters
The issue is that if the Listen Domain is not set, the subscription service substitutes the IP address from the X-Real-IP header in place of the connection address. As a result, the URL ends up looking like this: vless://<someuuid>@<client IP address>:<subscription port>?parameters
This, of course, breaks everything.
I found two solutions to this issue. Initially, I didn’t want to create a domain for 3x-ui, so I simply hardcoded the X-Real-IP in the Nginx configuration like this:
location ~ ^(/<subscription_location>/|/<subscription_json_location>/) { proxy_set_header X-Forwarded-Proto $scheme; proxy_set_header X-Real-IP <3x-ui public ip address>; proxy_set_header Range $http_range; proxy_set_header If-Range $http_if_range; proxy_redirect off; proxy_pass http://<3x-ui public/vpn ip address>:<filtered port>; } |
The second solution is to create a domain that points to the Xray public IP, set it as the Listen Domain, and configure Nginx as follows:
location ~ ^(/<subscription_location>/|/<subscription_json_location>/) { proxy_set_header Host 3x-ui.domain.name; #Same as configured in Listen Domain proxy_set_header X-Forwarded-Proto $scheme; proxy_set_header Range $http_range; proxy_set_header If-Range $http_if_range; proxy_redirect off; proxy_pass http://<3x-ui public/private ip address>:<filtered port>; } |
Host header and proxy_pass should be adjusted accordingly. However, if they are the same, and the subscription service is listening on an address filtered by the firewall, the configuration will follow a standard setup for reverse proxying a location, like this:location ~ ^(/<subscription_location>/|/<subscription_json_location>/) { proxy_set_header Host $host; proxy_set_header X-Forwarded-Proto $scheme;proxy_set_header Range $http_range; proxy_set_header If-Range $http_if_range; proxy_redirect off; proxy_pass http://<3x-ui public address>:<filtered port>; } |
Below is an example screenshot of the subscription configuration: