Debian dual boot with full encryption on LVM and enabled secure boot

Just a short note how to install Debian in dual boot with full encryption (without separate un-encypted boot).

I needed to preserve installed windows and didn’t wanted to touch bios settings, so the first needed thing is a un-allocated disk space.
During disk partitioning free space should be dedicated to encrypted partition.
After key is provided and partition initialized volume group and correspond logic volumes should be created on encrypted partition (it will be listed like /dev/nvme0n1p3_crypt).
At the latest stage of installation grub will be fail, to make grub seems installed you need to switch to second terminal and add GRUB_ENABLE_CRYPTODISK=y to /target/etc/grub:

echo GRUB_ENABLE_CRYPTODISK=y >> /target/etc/grub

Then repeat grub installation from menu.

The next steps I’ve made in recovery mode, because grub was continue insulting me with messages “error: Invalid passphrase. error: no such cryptodisk found.”

The most important step (and probably the only required) is to convert luks key from argon2i (which is turned out to be not supported by grub) to pbkdf2 with command:

cryptsetup luksConvertKey --pbkdf pbkdf2 /dev/nvme0n1p3

/dev/nvme0n1p3 should be the path to actual encrypted partition.

The last two steps are going in decrease of importance, probably they are not needed, but I’ve done them before key conversion, so not 100% sure.
Add cryptdevice=/dev/nvme0n1p3:lvm to the end of GRUB_CMDLINE_LINUX_DEFAULT in /etc/default/grub.

Re-install and update grub:

mount -t efivarfs none /sys/firmware/efi/efivars/ && \
grub-install --target=x86_64-efi --uefi-secure-boot --force-extra-removable /dev/nvme0n1 && \
update-grub

I’m the most skeptical about the last step since it’s usually needed when PC can’t load grub because of enabled secure boot and incorrect installation. But a saw message that it doesn’t accept LUKS password, so grub was definitely loaded.

Mikrotik: update WiFi PSK with randomly generated password and send it in telegram

Recently I upgraded my home WiFi with mikrotik cAP ac, the main reason to do it was an intention to configure guest WiFi with transparent traffic routing via TOR. Since I have intention to share guest password freely, I needed a way to change it from time to time. Firstly I wanted to make a telegram bot which would change wifi password via api call, but later I learned that it may be done with ugly scripting language which device supports.
More than that it has HTTP client, so I can change password by schedule and send it in telegram.

Here is the pre-requisites:
First, you should register the new bot with help of BotFather and get bot token, it looks like 110201543:AAHdqTcvCH1vGWJxfSeofSAs0K5PALDsaw
Second, you need to get your chat id with bot. I got it by sending a message to newly registered bot and fetching an update with curl:

$ curl 'https://api.telegram.org/bot110201543:AAHdqTcvCH1vGWJxfSeofSAs0K5PALDsaw/getUpdates'|jq '.result[].message.chat.id'

(chat id looks like 76615696).

The next thing to do is to create some sort of function to send message to telegram, it may be created with CLI or in WebFig -> System -> Scripts. Name tg_send, policy: read, write, policy, test

:local BotToken "110201543:AAHdqTcvCH1vGWJxfSeofSAs0K5PALDsaw";
:local ChatID "76615696";
:local ParseMode "html";
:local DisableWebPagePreview True;
:local SendText $MessageText;
 
:local tgUrl "https://api.telegram.org/bot$BotToken/sendMessage?chat_id=$ChatID&text=$SendText&parse_mode=$ParseMode&disable_web_page_preview=$DisableWebPagePreview";
 
/tool fetch http-method=get url=$tgUrl keep-result=no;

It’s important to replace BotToken and ChatID with your own token and id.

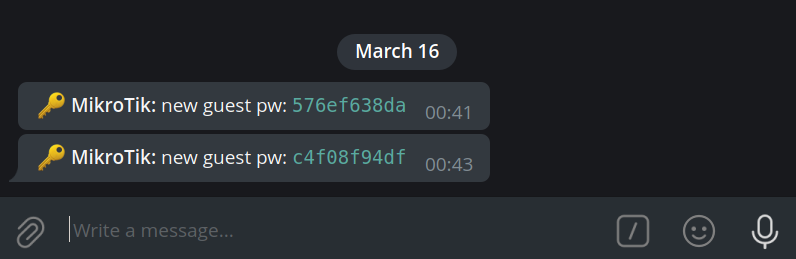
Previous script allows to make notification when password changed, the next one do the trick. Name: change_guest_pw, policy: read, write, policy, test, password.

:local ProfileName guest
:local DeviceName [/system identity get name];
:local PW ([:pick ([/certificate scep-server otp generate minutes-valid=0 as-value]->"password") 0 10])
 
 
:interface wireless security-profiles set $ProfileName wpa2-pre-shared-key="$PW";
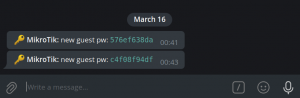
:local MessageText "\F0\9F\94\91 <b>$DeviceName:</b> new guest pw: <code>$PW</code>";
:local SendTelegramMessage [:parse [/system script get tg_send source]]; 
$SendTelegramMessage MessageText=$MessageText;

Here is important to replace ProfileName with your own security profile which is ‘guest‘ in my case.
After that change_guest_pw can be scheduled to be executed regularly.

mikrotik-PSK-change

PS
One of the first thing which I noticed when I got the new access point was useless hardware button which just switched off all LEDs. It’s possible to use it as a trigger for script execution.
Cli commands:

/system routerboard mode-button
set enabled=yes on-event=change_guest_pw

make it change WiFI password as well or it may be configured in WebFig -> System -> RouterBoard -> Mode Button

How to just send logs from files to graylog2

That solution allows to read logs from file and just send them to remote syslog/graylog server. Logs will not influent on current syslog settings, you won’t need to filter them out of any syslog facility (like local7), all you need – the rsyslog (I’ve used v8).

My task was to send logs which wrote by java application (if I’m right log4j was used), they were rotated by logrotate with truncation, so few specific options were added.
I replaced %APP-NAME% in rsyslog’s template(RSYSLOG_SyslogProtocol23Format) to be able differentiate from which files log messages were read.

As for me, it’s better to write logs in format which allow them to be parsed easily or send them right to remote location , but if you need to do it quickly without modification of application it’s appropriate solution. Just copy config below in file like  /etc/rsyslog.d/99-graylog.conf and modify TARGET.ADDRESS, TARGET.PORT, app_ tag and File setting according to your environment.

module(load="imfile")

template(
name="SyslogProtocol23Format_modified" type="string"
string="<%PRI%>1 %TIMESTAMP:::date-rfc3339% %HOSTNAME% %syslogtag%%$.suffix% %PROCID% %MSGID% %STRUCTURED-DATA% %msg%\n"
)

ruleset(name="sendToLogserver") {
action(type="omfwd" Target="TARGET.ADDRESS" Port="TARGET.PORT" Template="SyslogProtocol23Format_modified")
}

ruleset(name="app_logs") {
set $.suffix=re_extract($!metadata!filename, "(.*)/([^/]*)", 0, 2, "unknown.log");
call sendToLogserver
stop
}

input(
type="imfile"
File="/var/log/app_logs/*.log"
Tag="app_"
Ruleset="app_logs"
freshStartTail="on"
addMetadata="on"
)

In my case application wrote multi-line log messages, so startmsg.regex was used. Also logs were rotated by logrotate with truncate method, additional option reopenOnTruncate was used. So my input section looked like:

input(
type="imfile"
File="/var/log/app_logs/*.log"
Tag="app_"
Ruleset="app_logs"
freshStartTail="on"
addMetadata="on"
startmsg.regex="^[0-9]{4}-[0-9]{2}-[0-9]{2} "
reopenOnTruncate="on"
)

How to block IP ranges of specified autonomous system

If you want to prohibit access to your host for specified AS, you can use solution below. I made it some time ago, when I found out, that mail.ru hunting for hosts which help to bypass telegram censorship. It’s not perfect because I didn’t make much effort to it. Whois can return sub-networks and networks to which they belong in same response, so ipset set can contain duplicated ranges. Change ‘AS47764’ to AS which you want to block, ‘input_drop’ is an ipset set name.

ipset create input_drop hash:net comment
for i in $(whois -h whois.radb.net -- '-i origin AS47764' | grep 'route:'|cut -d : -f 2)
do
ipset add input_drop $i comment mail.ru
done
iptables -A INPUT -m set --match-set input_drop src -m comment --comment "DROP INPUT packets for AS47764" -j DROP

Also, i would recommend that solution, to make ipset rules persistent: https://github.com/BroHui/systemd-ipset-service

Galaxy S3: /efs/prox_cal doesn’t affect calibration settings under LineageOS

Few days ago I replaced front glass on samsung i9300 and flashed LineageOS 14.1. After that I’ve found that proximity sensor stays in triggered state, it may happened because of lack of experience (I’ve used too much UV-glue, so it was everywhere) or because of additional screen protector which been installed. Anyway, always-triggered-proximity-sensor made phone partially usable (you can’t cancel any call without pushing power button few times). I’ve found a lot of articles how to calibrate proximity sensor like this one. More over I’ve found that I shouldn’t do any calculation to update /efs/prox_cal, after auto-calibration /efs/prox_cal updated automatically (at least with kernel that shipped by default), but anyway it didn’t help me. Every reboot calibration  was reseted to zero.

For a first time, I’ve used proximity threshold value to fix proximity sensor, but later I saw that kernel driver read calibration directly from file and SELinux could be a reason why /efs/prox_cal haven’t effect.

Part that read calibration value looks like that:

#define CANCELATION_FILE_PATH "/efs/prox_cal"
...
int proximity_open_calibration(struct ssp_data *data)
{
 int iRet = 0;
 mm_segment_t old_fs;
 struct file *cancel_filp = NULL;
 
old_fs = get_fs();
 set_fs(KERNEL_DS);
 
cancel_filp = filp_open(CANCELATION_FILE_PATH, O_RDONLY, 0666);
 if (IS_ERR(cancel_filp)) {
 iRet = PTR_ERR(cancel_filp);
 if (iRet != -ENOENT)
 pr_err("[SSP]: %s - Can't open cancelation file\n",
 __func__);
 set_fs(old_fs);
 goto exit;
}

I’ve checked logcat and here is it:

05-06 21:29:12.916 3219 3219 W Binder:2377_A: type=1400 audit(0.0:39): avc: denied { read } for name="prox_cal" dev=mmcblk0p3 ino=46 scontext=u:r:system_server:s0 tcontext=u:object_r:efs_device_file:s0 tclass=file permissive=0

Definitely SELinux forbid reading of calibration file, I was surprised that SElinux capable to forbid kernel read call and now I feel a shame because usually I just disable it.

First I wanted to create new policy to allow reading of that file for kernel, but later I’ve found that /efs partition contains other calibration files, for example /efs/gyro_cal_data, I’ve checked security context of that files and found that it differs from /efs/prox_cal, it was u:object_r:sensors_data_file:s0 but prox_cal was created with default for /efs partition context u:object_r:efs_file:s0, so I’ve changed context:

# chcon u:object_r:sensors_data_file:s0 /efs/prox_cal

After that kernel started to load calibration value every boot. Looks like instructions like one mentioned above works for everyone who modified factory shipped prox_cal file with right security context, but I haven’t /efs/prox_cal before and it was created with wrong context.
I hope that story may help someone.

Simple OpenVPN profile generator

Few month ago i learned that OpenVPN support profiles. Before that i generate config for every client, create keys and certs with easy-rsa, tar it’s all together and put on client. Now i can create profile that will contain all necessary keys, certs and config in one file, so i write simple script that generate .ovpn profile for new client.
Generated .ovpn profile can be imported from sd card in Android, via iTunes or email in iOS, or just type `openvpn your_new_profile.ovpn` at PC.
Prerequisites: configured easy-rsa (`pkitool clientname` must produce cert and key for client).
You must customize config part for your server, it is possible to fetch data from server config file, but i’m too lazy to modify script for it.
There is it:

#!/bin/bash
#Dir where easy-rsa is placed
EASY_RSA_DIR="/etc/ssl/easy-rsa"
KEYS_DIR="$EASY_RSA_DIR/keys"
# Dir where profiles will be placed
OVPN_PATH="/root/ovpn"
REMOTE="your.server port"
 
 
if [ -z "$1" ]
then 
        echo -n "Enter new client common name (CN): "
        read -e CN
else
        CN=$1
fi
 
 
if [ -z "$CN" ]
        then echo "You must provide a CN."
        exit
fi
 
cd $EASY_RSA_DIR
if [ -f $KEYS_DIR/$CN.crt ]
then 
        echo "Certificate with the CN $CN already exists!"
        echo " $KEYS_DIR/$CN.crt"
else
source ./vars > /dev/null
./pkitool $CN
fi
 
cat > $OVPN_PATH/${CN}.ovpn << END
client
dev tun
resolv-retry infinite
nobind
persist-key
persist-tun
verb 1
comp-lzo
proto tcp
remote $REMOTE
 
<ca>
`cat $KEYS_DIR/ca.crt`
</ca>
 
<cert>
`sed -n '/BEGIN/,$p' $KEYS_DIR/${CN}.crt`
</cert>
 
<key>
`cat $KEYS_DIR/${CN}.key`
</key>
END

Zoneminder jitter

After several years of torture with easycap i realize that it is time to change capture device. I found that other usb capture device that supported by linux cost to high, also i can not use PCI or full height PCI-e devices because of mATX form factor of my server.  Suddenly i found ImpactVCB 1381, it is what i wanted to found, it is supported by linux, PCI-e and has half height bracket.
Before i did not try it card i did not think, that it is can be so much difference in image quality between two cards. Unfortunately i do not have sample with  easycap, but you can trust me, difference is enough to throw easycap.
As always there is a fly in the ointment, zoneminder or haupage driver has bug and captured image sometimes jittering, it is looks like that:
Zoneminder jitter

I preferred to think, that it is bug in zoneminder, because i did not seen same issue when i captured video with mencoder.
Will hope it will be fixed in future releases.

You IP

Since the idiots in the Russian government passed a law similar to ‘SOPA’ i started to modify routing scheme at my home. Many times i used internet.ya.ru to determine my current outgoing IP address, but i wanted to use more minimalistic tool for this purpose. So i created my own tool with blackjack and hookers, there it is: https://ivanbayan.com/uip.php i using different routes for TLS and http traffic, so it is also available there  https://ivanbayan.com/uip.php.
This script produce simple image with you outgoing ip:

You ip

Addresses of TOR relays

Some time ago i wrote about how to block access from TOR network.
Few days ago i observed, that file with addresses of TOR relays (http://exitlist.torproject.org/exit-addresses) not available anymore, i did not found similar list, so i wrote my own script with blackjack and hookers. Output of this script not compatible with format of “exit-addresses”, and represents a simple list of ipv4 addresses of TOR relays.

Enjoy: https://ivanbayan.com/tor_exitnodes_v4.txt

Kali linux on LiveUSB with working persistent partition

Few days ago i wanted to make liveusb with kali linux (i had backtrack before). I used this guide to install kali, but i observed, that persistence partition does not work. There is partitions on my usb drive:
Kali - old partition table
When init script found persistent partition and tried to mount  their return error “mount: mounting /dev/sdaX on /root/lib/live/mount/persistence/sdaX failed: Device or resource busy”.
I think this happened because official guide suggest to write iso9660 image on usb drive, and init script think that it is cd drive and mount whole usb device, not a partition where iso placed. This i found in boot.log:

There you can see, that after kali boot, usb drive (sda) still mounted, and i can not mount second partition:
Kali1
After that whole usb drive is busy.  I attached boot.log to this post with enabled debug, may be it will help someone to fix that.

I decided to make bootable usb disk instead of flashing iso on it. For doing that i used extlinux and original kali iso file.
First i create 2 partitions on usb drive, one for kali and second for persistent files:

Kali2

Do not forget to set bootable flag on first partition and correct label for persistent paririon.
After that, install mbr from extlinux:

$ dd if=/usr/lib/extlinux/mbr.bin of=/dev/sda
0+1 records in
0+1 records out
440 bytes (440 B) copied, 0.00126658 s, 347 kB/s

Copy kali linux on first partition:

$ mkdir /mnt/sr0 /mnt/kali
$ mount /dev/sr0 /mnt/sr0/
mount: block device /dev/sr0 is write-protected, mounting read-only
$ mount /dev/sda1 /mnt/kali/
$ rsync -a /mnt/sr0/* /mnt/kali

Also i modify boot menu and add entry with persistence boot option at live.cfg:

label live-686-pae-persistence
menu label ^Live persistence (686-pae)
menu default
linux /live/vmlinuz
initrd /live/initrd.img
append boot=live noconfig=sudo username=root hostname=android-53f31a089339194f persistence

After that you need to rename isolinux.cfg to extlinux.conf and install extlinux:

$ cp /mnt/kali/isolinux/isolinux.cfg /mnt/kali/isolinux/extlinux.conf
$ extlinux --install /mnt/kali/isolinux/
/mnt/kali/isolinux/ is device /dev/sda1

Mount persistence partition and create config:

$ mkdir /mnt/persist
$ mount /dev/sda2 /mnt/persist/
$ echo "/ union" > /mnt/persist/persistence.conf

After that you can reboot and check, that persistent partition work.
Kali3