What no one tells you about argocd applicationset and argocd-image-updater

I had a simple task, automatically deploy the latest available ‘latest’ docker image in kubernetes, sounds simple, right?
Argocd + argocd-image-updater and the task solved, can I go drink coffee?
NO!

Almost every second howto says, that if you want automatically update image to the newest for specific tag, you just need to set image update-strategy: digest, job done. When I followed that advice I observed the next:
1. argocd-image-updater detects new images and happily reports that it is updated:

time="2024-11-22T01:22:09Z" level=info msg="Starting image update cycle, considering 2 annotated application(s) for update"
time="2024-11-22T01:22:10Z" level=info msg="Setting new image to registry.gitlab.com/example/code/app/app:latest@sha256:0ddfbecb19e71511a2c0f5ead7f8334de127816001adb3faa002ccbee713bfcc" alias=app application=dev-app image_name=example/code/app/app image_tag=dummy registry=registry.gitlab.com
time="2024-11-22T01:22:10Z" level=info msg="Successfully updated image 'registry.gitlab.com/example/code/app/app@dummy' to 'registry.gitlab.com/example/code/app/app:latest@sha256:0ddfbecb19e71511a2c0f5ead7f8334de127816001adb3faa002ccbee713bfcc', but pending spec update (dry run=false)" alias=app application=dev-app image_name=example/code/app/app image_tag=dummy registry=registry.gitlab.com
time="2024-11-22T01:22:10Z" level=info msg="Committing 1 parameter update(s) for application dev-app" application=dev-app
time="2024-11-22T01:22:10Z" level=info msg="Successfully updated the live application spec" application=dev-app
time="2024-11-22T01:22:10Z" level=info msg="Processing results: applications=2 images_considered=2 images_skipped=0 images_updated=1 errors=0"

2. Argocd happily reports that everything in sync
3. Image is not updated

I’ve tried to search half a day what’s I’m doing wrong without success.
First clue I found – new event every 2 minutes in argocd’s app:

And after a while if you check application resource in kubernetes you will see a thousand of deploys:

  - deployStartedAt: "2024-11-21T22:54:55Z"
    deployedAt: "2024-11-21T22:54:56Z"
    id: 1407
    initiatedBy:
      automated: true
    revision: 9ca777c6397102b7599fce31d05a6fe73f81954c
    source:
      helm:
        valueFiles:
        - dev-values.yaml
      path: .
      repoURL: https://gitlab.com/example/deploys/app.git
      targetRevision: dev
  - deployStartedAt: "2024-11-21T22:56:56Z"
    deployedAt: "2024-11-21T22:56:56Z"
    id: 1408
    initiatedBy:
      automated: true
    revision: 9ca777c6397102b7599fce31d05a6fe73f81954c
    source:
      helm:
        valueFiles:
        - dev-values.yaml
      path: .
      repoURL: https://gitlab.com/example/deploys/app.git
      targetRevision: dev

That maked me start asking right questions: something is changed, but what? And when image-updater updates image how is it doing that? And how do applicateionset controller works?

I will answer these questions from the end:
1. Application set controller generates application resources from templates. It automatically overwrite application resource  if it doesn’t match generated.
2. When write-back-method set to argocd, argocd-image-updater changes application resource.

Now it’s clear what happened, they just fight each other. Image-updater see new image and update application resource, applicationset controller see that application resource different from generated and overwrite this.

Ok, what to do next? ApplicationSet have “elegant” solution called ignoreApplicationDifferences, which allows to ignore differences between actual application and generated, but what should be ignored?
That the most complicated question. At moment of writing I was unable to find answer in documentation. I just no see easy way to find out what exactly image-updater changes in policy and what applicationset controller reverts back. Here is no diff between manifests and changes happens so quickly that I was unable to see manifests itself.  I also found nothing in logs (at least without enabling debug logs for argocd).
Thanks to this issue I learned about applicationset controller policies, so here is a way to forbid applicationset controller patch/update application resources. And when I changed it, I finally was able to see the diff:

...
spec:
  source:
    helm:
      parameters:
      - forceString: true
        name: image.name
        value: registry.gitlab.com/example/code/app/app
      - forceString: true
        name: image.tag
        value: latest@sha256:0ddfbecb19e71511a2c0f5ead7f8334de127816001adb3faa002ccbee713bfcc
      valueFiles:
      - dev-values.yaml
...

The answer to the last question is: the image updater adds Helm parameters (at least if you are using Helm).
The “elegant” solution, which I “really like,” is to ignore Helm parameters. Since I planned to decouple Helm variables from ArgoCD applications and don’t want to use parameters at all, there’s not much harm in ignoring them. Nevertheless, each time I think about it, it annoys me how ugly this approach feels:

kind: ApplicationSet
spec:
  ignoreApplicationDifferences:
  - jqPathExpressions:
      - .spec.source.helm.parameters

PS
To be fair, this issue does not affect those who use the write-back-method:  git. However, since I only need the newest image for the latest tag and don’t care about which specific latest image it is, I don’t need to save its hash in git. Moreover, I don’t want to have a commit each time someone builds a new image.

Pinout for HP LFF ML310e/ML350e Gen8, ML30 Gen 9 disk cage

I need an small external storage (4-6 3.5″ disks) for home server and initially was thinking about buying external disk enclosure with SAS interface. However despite the fact that they do exist, I was unable to find one for reasonable price. Just a case for 5.25″ costs around €80, so I decided to try make DIY external enclosure.

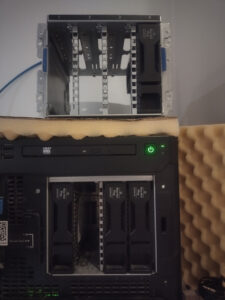
First thing needed is a drive cage, I’ve found that cages for ML310e/ML350e looks suitable and was able to buy one for around €50.
I got 674790-002 hot-plug version (686745-002 is not-hon plug version, I would pretty happy to get non-hot plug version but they were more expensive that one I got).
Looks like HP put something similar in HP Micro server gen 8 (at least caddy from microservers fits into cage):

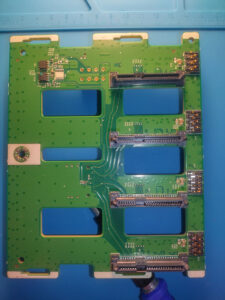
The disadvantage of hot-plug cage is unknown pinout. It’s simple board, from my understanding it provides power for disks (without conversion) and data connection (without expander):

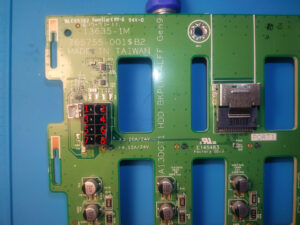
Here is power connector:
I used multimeter to just poke around the board and find traces from power to SAS power connectors, also I used photos of HP 822606-001 10 pin to 8 Pin connector, just to get a clue about 2 unknown pins.
Here is my findings:
Pin 1 – Unknown
Pin 2 – GND
Pin 3 – Unknown
Pin 4 – 5V
Pin 5 – GND
Pin 6 – 5V
Pin 7 – 12V
Pin 8 – GND

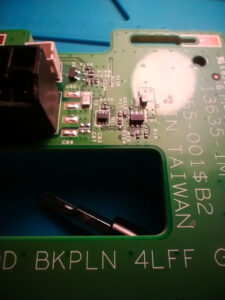
An interesting observation, pin 1 is not used by HP’s 10 pin to 8 pin adapter. Trace leads to small 2 pin connector and to component D2 (probably protection diode pair), which is close to Q1 ( transistor pair?) and U1 (most likely LDO).

Pin 3 – connected to an op-amp’s (TSV912AIDT) non-inverting input. That pin is used in 10 pin to 8 pin adapter (gray wire). That op-amp close to i2c EEPROM ATMLH602 and un-populated U5:

EEPROM’s i2c bus connected to un-populated U5, from which two traces go to SAS connector (sideband ?). I wonder why they left unconnected EEPROM on board? In that way HP will not be able to do their vendor lock or blackmail you into buying a subscription so that the equipment you bought will continue to work.

So I have no idea what is pin 1 for. It doesn’t look like power-on pin, because here is no power transistors. I have no idea what pin 3 is doing and why they need op-amp. It may be amplifier for thermistor for temperature monitoring, but again it makes little sense because pin connected to input of amplifier and it looks quite strange to use analog signal for that.

PS
One more curious observation, 3.3V on SAS  power port are unconnected

PPS
EEPROM

Debian dual boot with full encryption on LVM and enabled secure boot

Just a short note how to install Debian in dual boot with full encryption (without separate un-encypted boot).

I needed to preserve installed windows and didn’t wanted to touch bios settings, so the first needed thing is a un-allocated disk space.
During disk partitioning free space should be dedicated to encrypted partition.
After key is provided and partition initialized volume group and correspond logic volumes should be created on encrypted partition (it will be listed like /dev/nvme0n1p3_crypt).
At the latest stage of installation grub will be fail, to make grub seems installed you need to switch to second terminal and add GRUB_ENABLE_CRYPTODISK=y to /target/etc/grub:

echo GRUB_ENABLE_CRYPTODISK=y >> /target/etc/grub

Then repeat grub installation from menu.

The next steps I’ve made in recovery mode, because grub was continue insulting me with messages “error: Invalid passphrase. error: no such cryptodisk found.”

The most important step (and probably the only required) is to convert luks key from argon2i (which is turned out to be not supported by grub) to pbkdf2 with command:

cryptsetup luksConvertKey --pbkdf pbkdf2 /dev/nvme0n1p3

/dev/nvme0n1p3 should be the path to actual encrypted partition.

The last two steps are going in decrease of importance, probably they are not needed, but I’ve done them before key conversion, so not 100% sure.
Add cryptdevice=/dev/nvme0n1p3:lvm to the end of GRUB_CMDLINE_LINUX_DEFAULT in /etc/default/grub.

Re-install and update grub:

mount -t efivarfs none /sys/firmware/efi/efivars/ && \
grub-install --target=x86_64-efi --uefi-secure-boot --force-extra-removable /dev/nvme0n1 && \
update-grub

I’m the most skeptical about the last step since it’s usually needed when PC can’t load grub because of enabled secure boot and incorrect installation. But a saw message that it doesn’t accept LUKS password, so grub was definitely loaded.

How to pass host device to podman container in user mode using podman-compose

One of the main ideas of containerization is a way to achieve repeatable, hassle-free results. So, when I see headlines that podman gives the same experience and supports docker-compose like deployments (or even provides socket for native docker-compose), I expect that I can grab someone else’s docker-compose file, run $ podman-compose up and enjoy working installation of something. But it’s a trap.

In theory, if you leave service state management out of the equation, it works, but only if the payload doesn’t need access to devices, privileged ports, and you don’t need to organize interpods file sharing or sharing files between the host and pods.

Nevertheless, from time to time when I install a new host with the intention to use containers, I give podman a try as the “new shiny better” alternative to docker. I allocate time (like one evening), and if I’m unable to make it work as I need, I purge it and fall back to docker.

The last time I wanted to run prind in podman, my idea was:

  1. Create separate user
  2. Add it to dialout and video groups on the host system
  3. Run services in user-mode with podman-compose

Looks simple, right? But not in the case of podman.
First of all, device pass-thru doesn’t work in user mode, so if you want to use podman’s --device option, or device: section of compose file, you have to run it under root, which immediately wipes out a major part of podman’s advantages.
Second, podman uses user namespaces, uids:gids which  you see in a container not the same as in a host system. Because of that you may have user root in container which started by regular user, but in fact uids:gids will be offset to a host system by values configured in /etc/{subuid,subgid}, which means that even you have video group in the container, it will be different from the video group that the host system user may be a member of.
Because of that, my first two steps of the plan don’t work out of the box.

To counter that, quite recently, podman has an elegant and beautiful solution: you should add a group named keep-groups to the container with the --group-add option. So, here it is? You just add the group keep-groups to the groups section of the compose file? End of the story? Everything works as expected and everyone is happy? Nope!

For some reason it doesn’t work (at least in debian’s podman-compose 1.0.6-1~bpo12+1). But before this masterpiece was born, the same effect may be achieved with --annotation run.oci.keep_original_groups=1 and it works with compose. You need to mount volume /dev and add the next section:

services:
klipper:
...
volumes:
- /dev:/dev
annotations:
run.oci.keep_original_groups: 1
...

It makes groups looks weird and counter-intuitive in containers and forbids you adding new groups with `groups:` section, but it’s better than nothing:

print3d@aurora:~$ id
uid=1001(print3d) gid=1001(print3d) groups=1001(print3d),20(dialout),44(video),100(users)
print3d@aurora:~$ podman run --group-add keep-groups -v /dev:/dev -it m5p3nc3r/v4l-utils
✔ docker.io/m5p3nc3r/v4l-utils:latest
Trying to pull docker.io/m5p3nc3r/v4l-utils:latest...
Getting image source signatures
Copying blob 366c4c59e228 done
Copying blob 5843afab3874 done
Copying config 13e86697f5 done
Writing manifest to image destination
Storing signatures
/ # id
uid=0(root) gid=0(root) groups=65534(nobody),65534(nobody),65534(nobody),0(root)
/ # ls -l /dev/{ttyUSB1,video0}
ls: /dev/{ttyUSB1,video0}: No such file or directory
/ # ls -ln /dev/ttyUSB1
crw-rw---- 1 65534 65534 188, 1 Dec 26 15:26 /dev/ttyUSB1
/ # ls -ln /dev/video0
crw-rw---- 1 65534 65534 81, 0 Dec 17 15:01 /dev/video0
/ # v4l2-ctl --list-devices
UVC Camera (046d:0825) (usb-0000:04:00.3-5):
/dev/video0
/dev/video1
/dev/media0

The story of how I spent the evening enableing TMC2208 spreadCycle on Creality 1.1.5 board

I have ender 5 which come with creality 1.1.5 board with one little surprise, Marlin’s linear advance doesn’t work on it (klipper seems not to be happy too).
The reason is TMC2208 drivers which are in default stealthChop mode which doesn’t work well with rapid speed and direction changes.

TMC2208 is highly configurable in comparison to old drivers like A4988, but it utilizes half-duplex serial interface. Also it has default configuration stored in OTP (one time programming memory) which again may be changed via serial interface. So, here is two options, connect TMC2208 to onboard microcontroller  and let Marlin/Klipper to configure TMC2208 or change OTP.
It’s not so easy to find spare pin on this board (at least I thought so), so I decided to change OTP register.

Serial interface is exposed on PIN14 (PDN_UART) of TMC2208 chip:
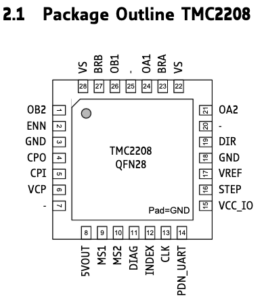
TMC2208 package

On popular stepstick type drivers which looks like this:
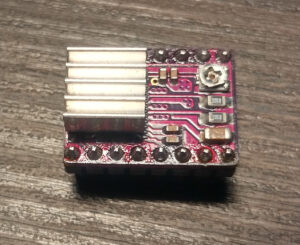
This pin is exposed and easily available, but it’s not the case. On Creality 1.1.5 board these drivers integrated.
I didn’t found the schematic for revision 1.1.5, but I’ve found PCB view of older revision. I’ve visually compared traces, vias, elements and designates around driver and found them very similar if not the same.

There is PCB view of extruder’s driver:

Extruder's driver

And there is a photo of board I have:
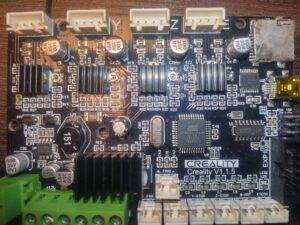
Creality 1.1.5 board

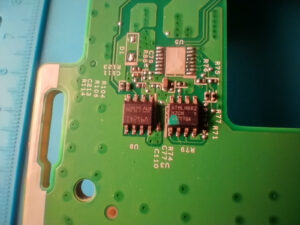
The needed PIN 14 is connected to PIN12 and 10K pull-up resistor.

To change OTP register I needed half-duplex serial and I had three most obvious options out of my head:

  • Use usb to serial adapter and join TX and RX lines
  • Use separate controller and do bing bang thing
  • Use onboard controller and just upload an arduino sketch to do the same (or even use TMC2208Stepper lib to just write OTP register)

I had no spare arduino around and wasn’t sure that will be able to get access to Marlin’s calibration stored in EEPROM and decided to use the first option (it didn’t work well and here is few different reason why which I will write at the end).

First you need ScriptCommunicator to send commands to TMC2208 from there: https://sourceforge.net/projects/scriptcommunicator/
Next, you need to get TMC2208.scez bundle from there: https://github.com/watterott/SilentStepStick/tree/master/ScriptCommunicator
Download them somewhere, they will be used later.

The solution for making half-duplex from usb to serial adapter which is in top of google result looks like that:

And here is my initial implementation:
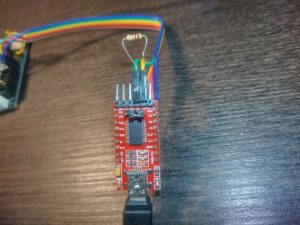
Half-duplex implementation
Resistor is just pushed into headers which are connected to RX and TX, only wire connected to RX is used to communicate with TMC2208.
My first idea was to solder wire to R24 (I need to enable spreadCycle only for extruder’s driver) and use usb to serial adapter like this:
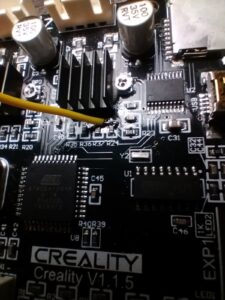
1st attempt to solder wire directly to R24

The whole construction (5V and GND were connected to ISP header’s pins 2 and 6 respectively):
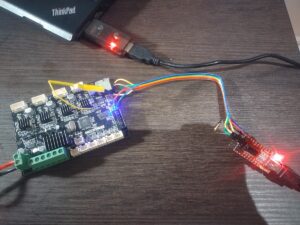
FTDI to Creality board connection

When everything ready, there is time to open TMC2208.scez, I used the version for linux, so for me it was command like:

/PATH/TO/ScriptCommunicator.sh /PATH/TO/TMC2208.scez

But unfortunately it didn’t work. Each time I hit connect button I got a message “Sending failed. Check hardware connection and serial port.” First I tried to lower connection speed (TMC2208 automatically detects baudrate, 115200 was configured in TMC2208.scez), but without positive result. Next I was checking all the connections between FTDI, resistor and TMC chip – no success. Un-pluging VCC from FTDI and powering board with external PSU – no connection.

I started to think what can went wrong, the fact that old  board revision for A4988 drivers looks pretty similar made me think that creality just put new chip in place of old one and here is obvious candidate INDEX PIN(12) which is connected to PDN. According to datasheet  INDEX is digital output, so if it is push-pull, it will definitely mess with serial communication. Only option to fix it is to cut trace between them and solder wire directly to PDN. Luckily it’s just two layer board, so needed trace can be easily located on the back side:
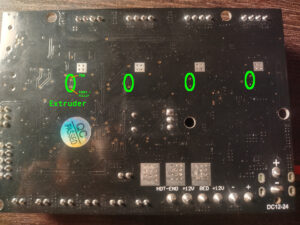
Cut like that:
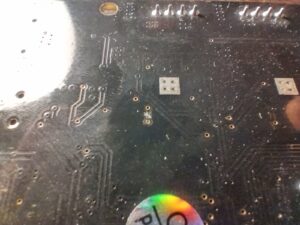
Back cut PDN to INDEX trace

And solder wire. Wire should be thin and soft otherwise there is a risk to peal off trace completely. Also it’s worth to check that here is no connectivity between wire and R24 after soldering:
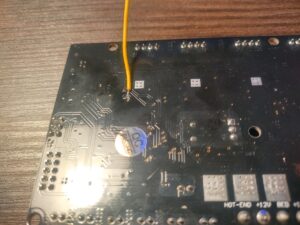
Back of the board, wire soldered to PDN

I thought that I would finally be able to configure TMC, but to my surprise only change I observed was an checksum error message which I got time to time instead of “Sending failed”.
It was around 1:30 after midnight and I almost gave up, when recalled in the very last moment that I have CH341 based programmer. I give it a try and finally it worked:
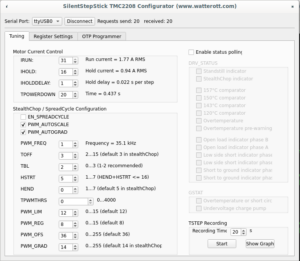
Configurator finally connected
Only additional change I made, I powered board from external supply, because it was easier than searching for 5V on programmer:
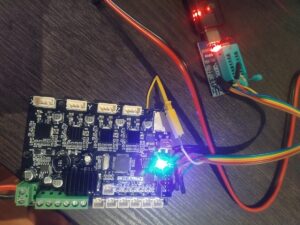
CH341 connected to board

Next to change of OTP (step by step video may be foun there).

OTP bits can be changed once, that action is irreversible additional attention is needed there.

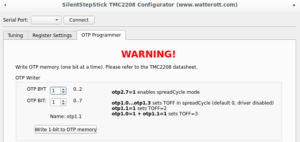
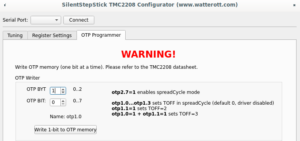
On “OTP Programmer” tab the byte #2 bit #7 should be written to enable spreadCycle mode. After that driver goes to disabled state, until “duration of slow decay phase” is configured to some value other than 0. For me it’s still opaque which value should be written, the SilentStepStick configurator suggests value 3, the same value used as default for stealthChop mode. Without having better ideas I wrote the same, first 4 bits of byte #1 controls  duration, to write value 3,  bit #0 and bit #1 should be written.
Complete sequence is below:
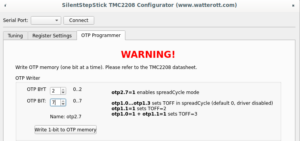
Byte 2 bit 7 Byte 1 bit 1 Byte 1 bit 0

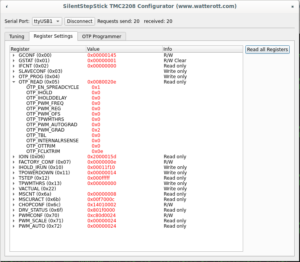
To make sure that OTP configured correctly, it’s needed to click “Read all Registers” button on “Register Settings” tab (not sure why on my screenshot I have OTP_PWM_GRAD equals 2 probably I made screenshot after writing only byte #1 bit #1):
Read OTP bits

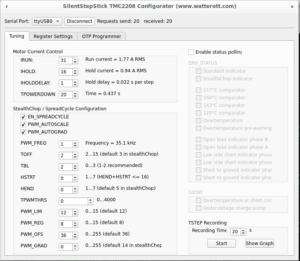
Or disconnect and connect to driver again, “Tuning” tab should have enabled spreadCycle and TOFF set to 3:
Mission complete

PS

Looking back, I see that here is not so much sense in changing OTP in that way or doing it at all.
First  making half-duplex serial just by connecting TX and RX with 1k resistor seems wrong. Atmel’s app not AVR947 suggest that it should looks like that:

Correct half-duplex joining

Which makes more sense and explains strange voltage around 2.8V I saw on PDN pin when I was troubleshooting FTDI. Possible explanations why FTDI didn’t work for me is that CH341 has different  threshold/voltage levels or has pull-up or my FTDI was partially damaged after series of unfortunate incidents.

Next if for some reason OTP should be changed, it’s easier to use MISO, MOSI or SCK pin from ISP pin header and make arduino sketch.

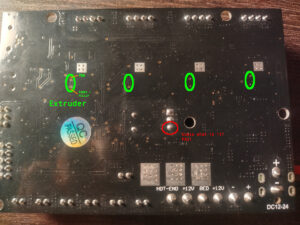
And finally, there I found that board has partially populated 3 PIN footprint, unused pin connected to pin #35 (PA2) of atmega installed on the board. Without  bltouch it’s the easiest option to have constant connection between controller and driver, which allows to use dynamic configuration. Even more with klipper it’s possible (but don’t know why) to have constant connection to each driver and even have bltouch by using SCK, MOSI, MISO (bye sdcard), BEEPER and PA2:
Unused GPIO

So far I have no bltouch, so even with configure OTP I’m going to solder a wire from PA2 to PDN just to have an option adjust driver configuration on the fly.

Thank for reading.

How to fix “Encryption credentials have expired” on xerox b215

Looks like I have new hobby  donated by xerox (if you can avoid greedy lying xerox, do it) – fixing my printer.
This time it just suddenly stopped to work with message “Encryption credentials have expired”. Previously I saw an option ‘Create new certificate’ on printer’s web page and my assumption was that probably certificate installed on printer was expired. At least I faced with that issues on embedded hardware like BMC’s many times, I tried to click on ‘Create new certificate’ button but it didn’t helped.
Let’s say thank you to xerox engineers and launch wireshark to figure out what happened. When I tried to resume print queue I saw communication on port 631 (IPP), which I able to decode as TLS in wireshark. openssl s_client shown expired certificate. Here is no option to uppload own key and certificate, but here is an option to downloads certificate signing request under Properties->Security->Machine Digital Certificate. So, I just created CA certificate:

$ openssl req -x509 -sha256 -days 3650 -newkey rsa:2048 -keyout rootCA.key -out rootCA.crt

Signed it using the next config:

$ cat > ./printer.conf << EOF
authorityKeyIdentifier=keyid,issuer
basicConstraints=CA:FALSE
subjectAltName = @alt_names
[alt_names]
DNS.1 = printer
DNS.2 = printer.local
IP.1 = 192.168.1.1
EOF
$ openssl x509 -req -CA rootCA.crt -CAkey rootCA.key -in PRINTER_request_sslCertificate.pem -out printer.crt -days 3649 -CAcreateserial -extfile printer.conf

And uploaded to printer.
Bonus point for SAN.

Make xerox b215 work with samba 4 again

Recently I bought xerox b215 (if you can, buy something other than xerox or hp) and wanted to make it scan to smb share. I already had configured samba in container using servercontainers/samba image.
So, it’s just to add another new share and configure user for scanner, right? Wrong!
It’ just didn’t worked. Thanks xerox’s engineers who decided not to burden end-user with diagnostic messages. It started scanning and after a second  returned back to the scan screen. Samba with log level 10 didn’t help me too, I just saw that client tried to connect and that all.
The tool which helped me is wireshark, I’ve found that after NTLMSSP_AUTH request from scanner samba sends STATUS_LOGON_FAILURE.

A little bit of “letsgoogleit” and voila ntlm auth = ntlmv1-permitted allowed me not to configure FTP for that lovely xerox.

Fix EFS dynamic provision on EKS

Probably it’s an obvious thing for people with more experience, but I spent an evening trying to figure out what’s wrong.

I have an EKS configured with terraform module terraform-aws-eks and IRSA configured like this:

module "efs_csi_irsa_role" {
  source = "terraform-aws-modules/iam/aws//modules/iam-role-for-service-accounts-eks"
 
  role_name             = "efs-csi"
  attach_efs_csi_policy = true
 
  oidc_providers = {
    ex = {
      provider_arn               = module.eks.oidc_provider_arn
      namespace_service_accounts = ["kube-system:efs-csi-controller-sa"]
    }
  }

At some point it started to work with static provisioning, but when I tried to use dynamic it stopped with the next errors in efs-csi-controller pod:

I1204 23:55:08.556870       1 controller.go:61] CreateVolume: called with args {Name:pvc-f725e33d-b1e5-44ff-a400-1f9ff8388296 CapacityRange:required_bytes:5368709120  VolumeCapabilities:[mount:&lt;&gt; access_mode: ] Parameters:map[basePath:/dynamic_provisioning csi.storage.k8s.io/pv/name:pvc-f725e33d-b1e5-44ff-a400-1f9ff8388296 csi.storage.k8s.io/pvc/name:efs-claim2 csi.storage.k8s.io/pvc/namespace:kva-prod directoryPerms:700 fileSystemId:fs-031e4372b15a36d5a gidRangeEnd:2000 gidRangeStart:1000 provisioningMode:efs-ap] Secrets:map[] VolumeContentSource: AccessibilityRequirements: XXX_NoUnkeyedLiteral:{} XXX_unrecognized:[] XXX_sizecache:0}
I1204 23:55:08.556934       1 cloud.go:238] Calling DescribeFileSystems with input: {
  FileSystemId: "fs-031e4372b15a36d5a"
}
E1204 23:55:08.597320       1 driver.go:103] GRPC error: rpc error: code = Unauthenticated desc = Access Denied. Please ensure you have the right AWS permissions: Access denied

And here is what I missed, official documentation uses eksctl for IRSA:

eksctl create iamserviceaccount \
    --cluster my-cluster \
    --namespace kube-system \
    --name efs-csi-controller-sa \
    --attach-policy-arn arn:aws:iam::111122223333:policy/AmazonEKS_EFS_CSI_Driver_Policy \
    --approve \
    --region region-code

SA creation is disabled with helm:

helm upgrade -i aws-efs-csi-driver aws-efs-csi-driver/aws-efs-csi-driver \
    --namespace kube-system \
    --set image.repository=602401143452.dkr.ecr.region-code.amazonaws.com/eks/aws-efs-csi-driver \
    --set controller.serviceAccount.create=false \
    --set controller.serviceAccount.name=efs-csi-controller-sa

So I missed service annotation. The thing which have helped me to figure out what’s wrong (no it wasn’t careful reading of the documentation) was CloudTrail:

    "userIdentity": {
        "type": "AssumedRole",
        "principalId": "EKYQJEOBHPAS7L:i-deadbeede490d57b1",
        "arn": "arn:aws:sts::111122223333:assumed-role/default_node_group-eks-node-group-20220727213424437600000003/i-deadbeede490d57b1",
        "accountId": "111122223333",
        "sessionContext": {
            "sessionIssuer": {
                "type": "Role",
                "principalId": "EKYQJEOBHPAS7L",
                "arn": "arn:aws:iam::111122223333:role/default_node_group-eks-node-group-20220727213424437600000003",
                "accountId": "111122223333",
                "userName": "default_node_group-eks-node-group-20220727213424437600000003"
            },
            "webIdFederationData": {},
            "attributes": {
                "creationDate": "2022-12-04T23:20:40Z",
                "mfaAuthenticated": "false"
            },
            "ec2RoleDelivery": "2.0"
        }
    },
    "errorMessage": "User: arn:aws:sts::111122223333:assumed-role/default_node_group-eks-node-group-20220727213424437600000003/i-deadbeede490d57b1 is not authorized to perform: elasticfilesystem:DescribeFileSystems on the specified resource",

Assuming role as a node differently not what I expected.

If I have been more thoughtful I may ask myself what comment “## Enable if EKS IAM for SA is used” was doing in aws-efs-csi-driver’s values.yaml but I hadn’t.
Evening spent, lesson learned.

PS

And  that update of service account doesn’t lead to magical appear of  AWS_WEB_IDENTITY_TOKEN_FILE env in container is a thing that worth to remember.

PPS

Looks like static provisioning will work even with broken IRSA for EFS, since NFS which is under the hood of EFS not be bothered by IAM existence in any sense.

Mikrotik: update WiFi PSK with randomly generated password and send it in telegram

Recently I upgraded my home WiFi with mikrotik cAP ac, the main reason to do it was an intention to configure guest WiFi with transparent traffic routing via TOR. Since I have intention to share guest password freely, I needed a way to change it from time to time. Firstly I wanted to make a telegram bot which would change wifi password via api call, but later I learned that it may be done with ugly scripting language which device supports.
More than that it has HTTP client, so I can change password by schedule and send it in telegram.

Here is the pre-requisites:
First, you should register the new bot with help of BotFather and get bot token, it looks like 110201543:AAHdqTcvCH1vGWJxfSeofSAs0K5PALDsaw
Second, you need to get your chat id with bot. I got it by sending a message to newly registered bot and fetching an update with curl:

$ curl 'https://api.telegram.org/bot110201543:AAHdqTcvCH1vGWJxfSeofSAs0K5PALDsaw/getUpdates'|jq '.result[].message.chat.id'

(chat id looks like 76615696).

The next thing to do is to create some sort of function to send message to telegram, it may be created with CLI or in WebFig -> System -> Scripts. Name tg_send, policy: read, write, policy, test

:local BotToken "110201543:AAHdqTcvCH1vGWJxfSeofSAs0K5PALDsaw";
:local ChatID "76615696";
:local ParseMode "html";
:local DisableWebPagePreview True;
:local SendText $MessageText;
 
:local tgUrl "https://api.telegram.org/bot$BotToken/sendMessage?chat_id=$ChatID&text=$SendText&parse_mode=$ParseMode&disable_web_page_preview=$DisableWebPagePreview";
 
/tool fetch http-method=get url=$tgUrl keep-result=no;

It’s important to replace BotToken and ChatID with your own token and id.

Previous script allows to make notification when password changed, the next one do the trick. Name: change_guest_pw, policy: read, write, policy, test, password.

:local ProfileName guest
:local DeviceName [/system identity get name];
:local PW ([:pick ([/certificate scep-server otp generate minutes-valid=0 as-value]->"password") 0 10])
 
 
:interface wireless security-profiles set $ProfileName wpa2-pre-shared-key="$PW";
:local MessageText "\F0\9F\94\91 <b>$DeviceName:</b> new guest pw: <code>$PW</code>";
:local SendTelegramMessage [:parse [/system script get tg_send source]]; 
$SendTelegramMessage MessageText=$MessageText;

Here is important to replace ProfileName with your own security profile which is ‘guest‘ in my case.
After that change_guest_pw can be scheduled to be executed regularly.

mikrotik-PSK-change

PS
One of the first thing which I noticed when I got the new access point was useless hardware button which just switched off all LEDs. It’s possible to use it as a trigger for script execution.
Cli commands:

/system routerboard mode-button
set enabled=yes on-event=change_guest_pw

make it change WiFI password as well or it may be configured in WebFig -> System -> RouterBoard -> Mode Button

Test of 5 AC-DC PSUs cheaper than $1.5

I need  220AC to 5V PSU for exhaust fan controller, the trickiest part – it should be as small as possible. The main load is LEDs, same time supplied voltage should be clean enough for analog to digital conversions doing by attiny85. So I bought and test 6 different PSU. Because of seller mistake one of them turned up to be 220 to 12V PSU, so only 5 of them were tested.

TL;DR
All of them produces awful output exception of #1 and #3 (hilink)
The winner is #1, it’s one of the smallest (12X25X18 mm), one of the cheapest ($0.77), rated at 5V 700mA power supply.
No one of them (with exception of hi-link) doesn’t look safe enought to be treated as galvanic isolated PSU.
Here is a table for quick comparison, but out of the box (without changing capacitors or adding filters), only #1 and #3 worth to buy:

Continue reading