Some time ago i wrote about how to block access from TOR network.
Few days ago i observed, that file with addresses of TOR relays (http://exitlist.torproject.org/exit-addresses) not available anymore, i did not found similar list, so i wrote my own script with blackjack and hookers. Output of this script not compatible with format of “exit-addresses”, and represents a simple list of ipv4 addresses of TOR relays.
Tag: security
Kali linux on LiveUSB with working persistent partition
Few days ago i wanted to make liveusb with kali linux (i had backtrack before). I used this guide to install kali, but i observed, that persistence partition does not work. There is partitions on my usb drive:
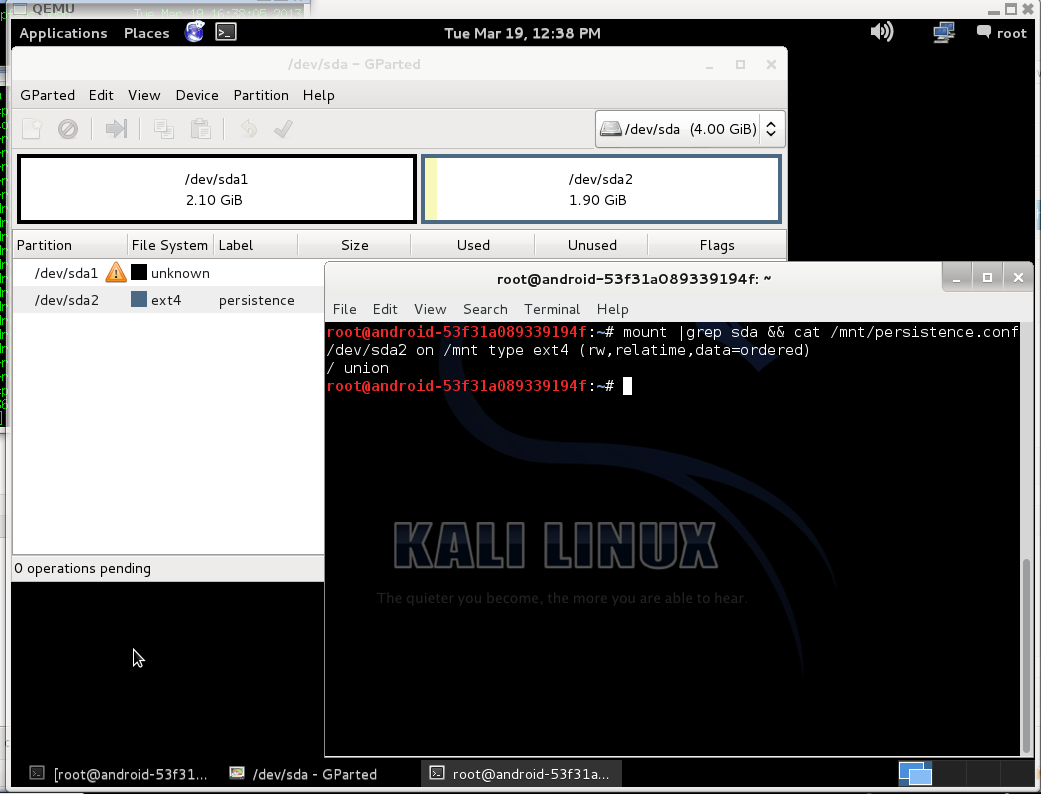
When init script found persistent partition and tried to mount their return error “mount: mounting /dev/sdaX on /root/lib/live/mount/persistence/sdaX failed: Device or resource busy”.
I think this happened because official guide suggest to write iso9660 image on usb drive, and init script think that it is cd drive and mount whole usb device, not a partition where iso placed. This i found in boot.log:
There you can see, that after kali boot, usb drive (sda) still mounted, and i can not mount second partition:
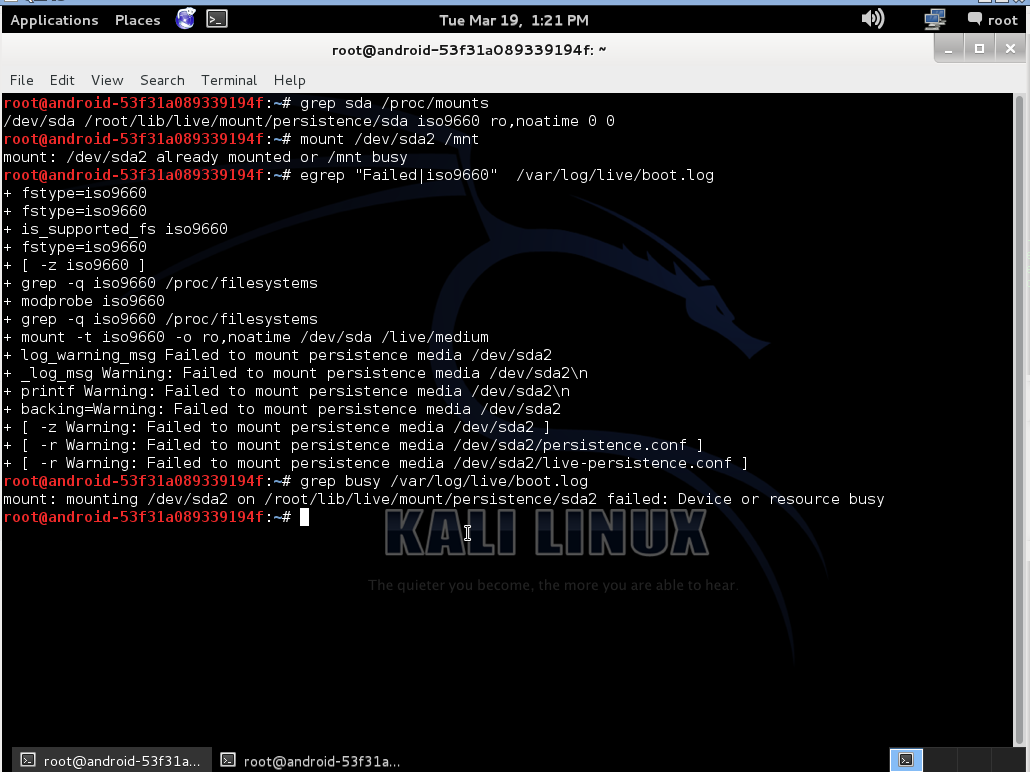
After that whole usb drive is busy. I attached boot.log to this post with enabled debug, may be it will help someone to fix that.
I decided to make bootable usb disk instead of flashing iso on it. For doing that i used extlinux and original kali iso file.
First i create 2 partitions on usb drive, one for kali and second for persistent files:
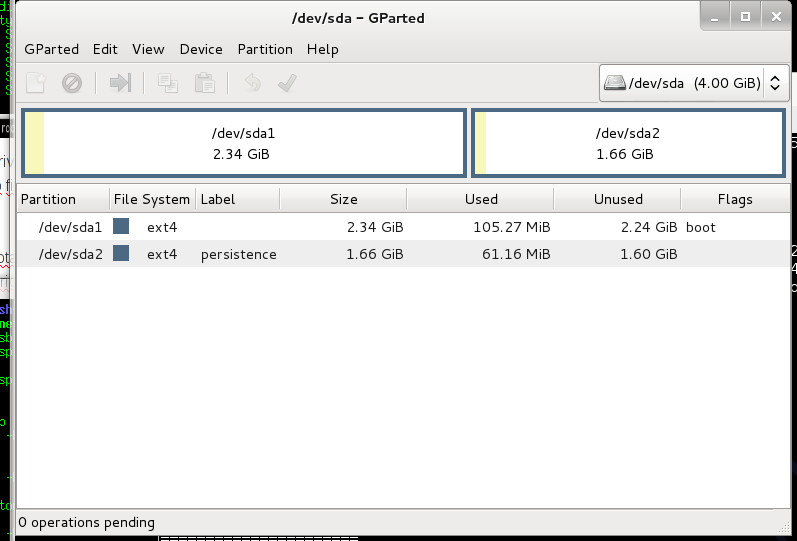
Do not forget to set bootable flag on first partition and correct label for persistent paririon.
After that, install mbr from extlinux:
$ dd if=/usr/lib/extlinux/mbr.bin of=/dev/sda 0+1 records in 0+1 records out 440 bytes (440 B) copied, 0.00126658 s, 347 kB/s |
Copy kali linux on first partition:
$ mkdir /mnt/sr0 /mnt/kali $ mount /dev/sr0 /mnt/sr0/ mount: block device /dev/sr0 is write-protected, mounting read-only $ mount /dev/sda1 /mnt/kali/ $ rsync -a /mnt/sr0/* /mnt/kali |
Also i modify boot menu and add entry with persistence boot option at live.cfg:
label live-686-pae-persistence menu label ^Live persistence (686-pae) menu default linux /live/vmlinuz initrd /live/initrd.img append boot=live noconfig=sudo username=root hostname=android-53f31a089339194f persistence |
After that you need to rename isolinux.cfg to extlinux.conf and install extlinux:
$ cp /mnt/kali/isolinux/isolinux.cfg /mnt/kali/isolinux/extlinux.conf $ extlinux --install /mnt/kali/isolinux/ /mnt/kali/isolinux/ is device /dev/sda1 |
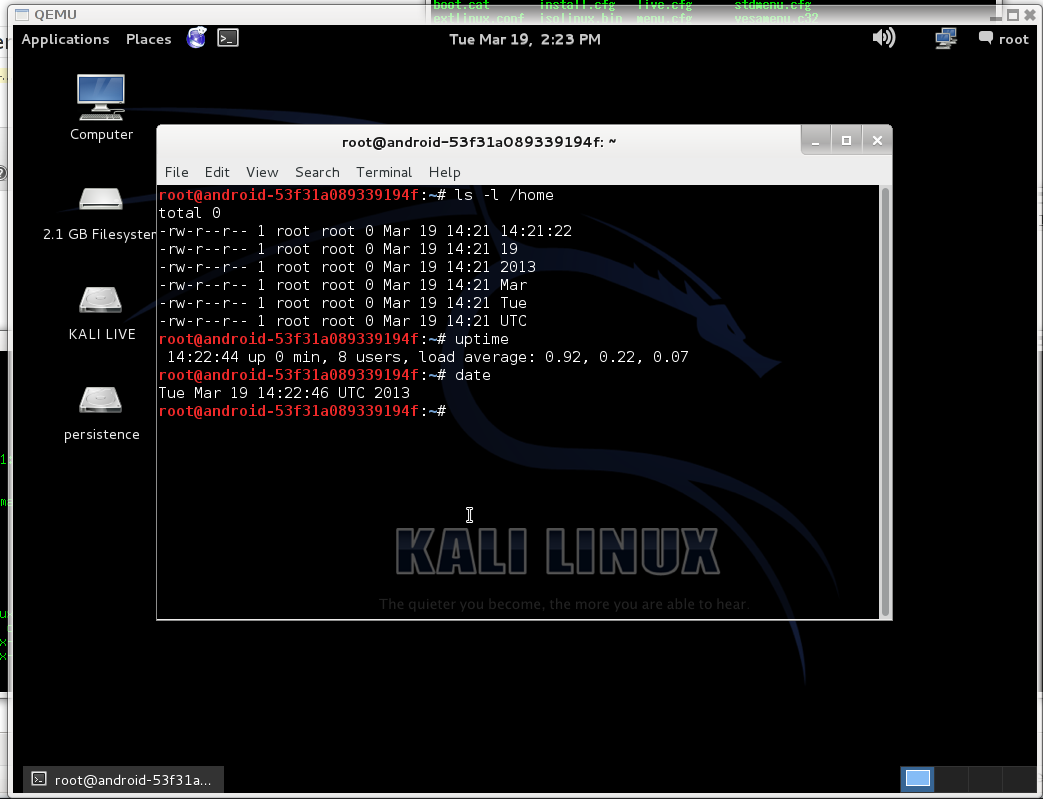
Mount persistence partition and create config:
$ mkdir /mnt/persist $ mount /dev/sda2 /mnt/persist/ $ echo "/ union" > /mnt/persist/persistence.conf |
After that you can reboot and check, that persistent partition work.
Failsafe zoneminder with gluster and geo-replication.
 Near year ago i configured zoneminder for monitoring my approach. But i got one problem, host that running zoneminder placed in same approach, so, if it will be stolen, it will be stolen with recordings. I spend a lot of time while choosing solution to organize replication on remote server. Most solution that i found work in “packet” mode, they start replication once in NN sec or after accumulating a certain number of events and usually use rsync. Rsync allow to reduce traffic usage, but increase time between event when new frame will be wrote on disk and event when frame will be wrote on remote side. In this situation every second counts, so I thought that solutions like “unison”, “inosync”, “csync2”, “lsyncd” not applicable.
I tried to use drbd, but get few problems. First – i do not have separate partition on host and can not shrink existing partitions to get new. I tried it with loopback devices, but drbd have deadlock bug when used with loopback. This solution work near two days after deadlock occurs, you can not read content of mounted fs or unmount it and only one solution to fix it that i found – reboot. Second problem – “split brain” situation, when master host restart. I did not spent time to found solution because all ready had first problem. May be it can be fixed with split-brain handlers script or with “heartbeat”. Drbd has great write speed in asynchronous mode and has small overhead, so, may be in another situation i will choose drbd.
Next what i tried was “glusterfs”, first i tried glusterfs 3.0. It was easily to configure it, and glusterfs was worked, but very slow. For good performance glusterfs need short latency between hosts. It useful for local networks but completely useless for hosts connected over slow links. Also glusterfs 3.0 did not have asynchronous write like in drbd. I temporarily thrown searching for solutions, but after a while in release notes for glusterfs 3.2 i found that gluster got “geo-replication“. First i think that this it what i need and before has understood (see conclusion) how it work i started to configure it.
If you will have troubles with configuration, installation here you can find manual.
For Debian, first that you need is to add backports repository on host with zonemnider and on hosts where you planned to replicate data:
$ echo 'deb http://backports.debian.org/debian-backports squeeze-backports \ main contrib non-free' >> /etc/apt/sources.list $ apt-get update $ apt-get install glusterfs-server |
After that you must open ports for gluster on all hosts where you want to use it:
$ iptables -A INPUT -m tcp -p tcp --dport 24007:24047 -j ACCEPT $ iptables -A INPUT -m tcp -p tcp --dport 111 -j ACCEPT $ iptables -A INPUT -m udp -p udp --dport 111 -j ACCEPT $ iptables -A INPUT -m tcp -p tcp --dport 38465:38467 -j ACCEPT |
If you do not planned to use glusterfs over NFS (as i) you can skip last rule.
After ports will opened, gluster installed and service running you need to add gluster peers. For example you run zoneminder on host “zhost” and want to replicate it on host “rhost” (do not forget add hosts in /etc/hosts on both sides). Run “gluster” and add peer (here and below gluster commands must to be executed on master host, i.e. on zhost):
$ gluster
gluster> peer probe rhost |
Let’s check it:
gluster> peer status Number of Peers: 1 Hostname: rhost Uuid: 5e95020c-9550-4c8c-bc73-c9a120a9e96e State: Peer in Cluster (Connected) |
Next necessary to create volumes on both hosts, do not forget to create directories where gluster will save their files. For examples you planned to use “/var/spool/glusterfs”:
gluster> volume create zoneminder transport tcp zhost:/var/spool/glusterfs Creation of volume zoneminder has been successful. Please start the volume to access data. gluster> volume create zoneminder_rep transport tcp rhost:/var/spool/glusterfs Creation of volume zoneminder_rep has been successful. Please start the volume to access data. gluster> volume start zoneminder Starting volume zoneminder has been successfu gluster> volume start zoneminder_rep Starting volume zoneminder_rep has been successfu |
After that you must configure geo-replication:
gluster> volume geo-replication zoneminder gluster://rhost:zoneminder_rep start Starting geo-replication session between zoneminder & gluster://rhost:zoneminder_rep has been successful |
And check that it is work:
gluster> volume geo-replication status MASTER SLAVE STATUS -------------------------------------------------------------------------------- zoneminder gluster://rhost:zoneminder_rep starting... gluster> volume geo-replication status MASTER SLAVE STATUS -------------------------------------------------------------------------------- zoneminder gluster://rhost:zoneminder_rep OK |
Also i made next configurations:
gluster> volume geo-replication zoneminder gluster://192.168.107.120:zoneminder_rep config sync-jobs 4 geo-replication config updated successfully gluster> volume geo-replication zoneminder gluster://192.168.107.120:zoneminder_rep config timeout 120 geo-replication config updated successfully gluster> volume set zoneminder nfs.disable on Set volume successful gluster> volume set zoneminder_rep nfs.disable on Set volume successful gluster> volume set zoneminder nfs.export-volumes off Set volume successful gluster> volume set zoneminder_rep nfs.export-volumes off Set volume successful gluster> volume set zoneminder performance.stat-prefetch off Set volume successful gluster> volume set zoneminder_rep performance.stat-prefetch off Set volume successful |
I disabled nfs because i did not planned to use gluster volumes over nfs, also i disabled prefetch because they produce next error on geo-ip modules:
E [stat-prefetch.c:695:sp_remove_caches_from_all_fds_opened] (-->/usr/lib/glusterfs/3.2.7/xlator/mount/fuse.so(fuse_setattr_resume+0x1b0) [0x7f2006ba8ed0] (-->/usr/lib/glusterfs/3.2.7/xlator/debug/io-stats.so (io_stats_setattr+0x14f) [0x7f200467db8f] (-->/usr/lib/glusterfs/3.2.7/xlator/performance/stat-prefetch.so(sp_setattr+0x7c) [0x7f200489c99c]))) 0-zoneminder_rep-stat-prefetch: invalid argument: inode |
In conclusion i must to say, that it is not a solution that i looked for, because as it turned out gluster use rsync for geo-replication. Pros of this solution: it is work and easy to setup. Cons it is use rsync. Also i expected that debian squeeze can not mount gluster volumes in boot sequence, i tried to modify /etc/init.d/mountnfs.sh but without result, so i just add mount command in zoneminder start script.
PS
echo ‘cyclope:zoneminder /var/cache/zoneminder glusterfs defaults 0 0’ >> /etc/fstab
And add ‘mount /var/cache/zoneminder’ in start section of /etc/init.d/zoneminder
PPS
Do not forget to stope zoneminder and copy content of /var/cache/zoneminder on new partition before using it.
How to block large ip subset on the example of TOR
I wrote before how i blocked TOR exit nodes by iptables, disadvantages of method that i used before – big amount of rules (one per each ip). This solution easy and obvious, but had speed penalty. Today i want write about more effective solution that use ipset, let’s see what is ipset:
IP sets are a framework inside the Linux 2.4.x and 2.6.x kernel, which can be administered by the ipset utility. Depending on the type, currently an IP set may store IP addresses, (TCP/UDP) port numbers or IP addresses with MAC addresses in a way, which ensures lightning speed when matching an entry against a set. If you want to store multiple IP addresses or port numbers and match against the collection by iptables at one swoop; dynamically update iptables rules against IP addresses or ports without performance penalty; express complex IP address and ports based rulesets with one single iptables rule and benefit from the speed of IP sets then ipset may be the proper tool for you.
Because of exit nodes can exist on hosts that using dynamic IP i want to delete addresses from list after timeout (otherwise list will always growing and contain unused addresses or addresses without TOR exit nodes, larger list requires more memory and CPU time for processing). If addresses persist between list updates, timeout will be reseted.
To do this i used iptree set (you can learn more about set types in manual for ipset), because that type provide timeout for each address.
First i installed ipset:
# apt-get install xtables-addons-common |
After that i modify scripts that i used before. In perl script i made a pair of minor bug fixes and in shell script i add new facility for loading rules into ipset.
Perl script:
#!/usr/bin/perl -w use strict; use LWP::Simple; my $list = get("http://exitlist.torproject.org/exit-addresses"); my $i; my @ips; if( ! defined( $list ) ) { exit( 1 ); } if( $#ARGV == -1 ) { exit(0); } foreach $i (split( /\n/, $list )) { push( @ips, $1 ) if( $i =~ m/((?:\d{1,3}\.){3}\d{1,3})/); } if( $ARGV[0] eq "-ip" ) { print( join( "\n", @ips ) . "\n"); } |
That script return exit code without arguments that signaled can this script fetch addresses or not, with parameter “-ip” they return list of addresses.
Next shell script:
#!/bin/bash SOLVE="/root/bin/solve.pl" IPSET="/usr/sbin/ipset" case "$1" in ipset) if ! /usr/bin/perl $SOLVE then echo "Can not fetch Tor exit nodes" 1>&2 exit 1 fi if ! $IPSET -L tor 2>&1 > /dev/null then $IPSET -N tor iptree --timeout 259200 fi for i in `/usr/bin/perl $SOLVE -ip` do $IPSET -A tor $i 2> /dev/null done ;; iptables) if /usr/bin/perl $SOLVE then /sbin/iptables -F TorExitnodes /sbin/iptables -I TorExitnodes -j RETURN for i in `/usr/bin/perl $SOLVE -ip` do /sbin/iptables -I TorExitnodes -s $i -j TorBlockAndLog done else echo "Can not fetch Tor exit nodes" 1>&2 exit 1; fi ;; *) echo "Usage ./$0 " exit 1 ;; esac exit 0 |
This script can add rules into iptables (old variant) or into ipset. I added this script in cron and run every few hours. When ipset found that address all ready in list, they update timeout, if address will not observed in 72 hours, they will be automatically deleted.
Finishing touch – new rule in iptables:
# iptables -A INPUT -i eth+ -m set --match-set tor src -m comment --comment "Block TOR exit nodes thru IPSET" -j DROP |
That’s all. Do not forget to place this rule before rules where you permit access to your server.
How to transfer data between hosts securely.
 From time to time i faced with task how to transfer important data between servers securely (ie over ssl or something similar). I do not use passwords for remote access and do not have private keys on remote systems, so i can not use ssh for this purposes.
First i wanted to write about solution that i used few days ago (based on socat), but this solution is to complicated (later you will see why). I remembered that openssl can encrypt files with password and send result to STDOUT. While i was reading manual for openssl, i found that openssl can be used like netcat (s_server and s_client commands), unfortunately i did not found way how to use openssl for data transfer, because in session that you can establish openssl interprets some chars as commands (R for renegotiation for example), so if you want to use openssl client/server for data transfer, you need something like base64 encoding, but without control characters.
Solution with netcat and openssl:
First i created file for test (you can use data from STDIN, tar output for example, or transfer existing file):
client$ dd if=/dev/urandom of=/tmp/rand bs=1M count=10 10+0 records in 10+0 records out 10485760 bytes (10 MB) copied, 1.36697 seconds, 7.7 MB/s client$ md5sum /tmp/rand 10fe36edbbd48cde844ad1a2a29a8e0f /tmp/rand |
Next, prepare server side:
server$ read pass PasSwOrD server$ nc -l -p 6667|openssl aes-256-cbc -d -k $pass > /tmp/rand |
I used “read” to prevent save key into history file.
There “PasSwOrD” is your key, i use ssh to organize data transfer, so i did not worried that the traffic with key can be captured.
Next initiate transfer from client side:
client$ read pass PasSwOrD client$ cat /tmp/rand |openssl aes-256-cbc -salt -k $pass|nc -w1 server.remote 6667 |
Check sum:
server$ md5sum /tmp/rand 10fe36edbbd48cde844ad1a2a29a8e0f /tmp/rand |
Yeah! Your see? I transfered mah file.
UPDATE: [2019-05-26] Nowaday openssl has broken backward compatibility, so when you try to decrypt file you cold get error message like `digital envelope routines:EVP_DecryptFinal_ex:bad decrypt:crypto/evp/evp_enc.c:535`, if so you need to add -md md5 or -md sha256 on both sides to openssl’s options.
Ok, next we will do it with socat.
First you need to generate client side and server side key and certificates, let’s do it on server:
server$ openssl genrsa -out server.key 2048 Generating RSA private key, 2048 bit long modulus ........+++ ......................................+++ e is 65537 (0x10001) |
Create certificate:
server$ openssl req -new -key server.key -x509 -days 108 -batch -out server.crt |
Create pem file:
server$ cat server.* > ./server.pem |
After that you will need to execute same commands on client side, but you will need to change filenames from “server” to “client”.
Next step is to exchange certificates between client and server (do it on both sides), they could be copy pasted:
server$ cat > ./client.crt << EOF -----BEGIN CERTIFICATE----- .... a lot of garbage .... -----END CERTIFICATE----- EOF |
Now we ready to transfer file, prepare server:
server$ socat openssl-listen:4433,reuseaddr,cert=./server.pem,cafile=./client.crt STDIO > /tmp/rand |
Client:
client$ socat STDIO openssl-connect:server.remote:4433,cert=./client.pem,cafile=./server.crt < /tmp/rand |
client$ md5sum /tmp/rand 10fe36edbbd48cde844ad1a2a29a8e0f /tmp/rand |
Gotcha!
As you can see, socat with TLS not a easy solution if you need just a transfer file, so i will recommend to use first solution. Also, in debian, you can use snakeoil key and cert, but it is your homework.
UPDATE:
I found how to use openssl for data transfer, only one problem, they did not close socket after EOF, so you need to stop it by hands:
Prepare server (this time i used snakeoil cert):
server% sudo openssl s_server -quiet -accept 4343 -cert /etc/ssl/certs/ssl-cert-snakeoil.pem -key /etc/ssl/private/ssl-cert-snakeoil.key < /tmp/test |
Run client:
client% md5sum /tmp/rnd 86246865b3932804979fdac48a99cebf /tmp/rnd client% openssl s_client -connect localhost:4343 -quiet > /tmp/rnd |
After data transfered, hit ^C on server side and check:
^C server% md5sum /tmp/test 86246865b3932804979fdac48a99cebf /tmp/test |
Tor blacklist
 Few month ago i was interested in how to block incoming traffic from Tor network. Tor network have finitely numbers of exit nodes, so the solution is to block traffic from this nodes. I see two solutions how to block exit nodes. First use TorDNSEL service, in brief you can check that connection comes from Tor exit node or not by querying special domain name. It is useful if you want to do this check in your php script, for example. But i do not know how to protect host completely by this method. Another way is to use exitlist. By this way you can get list of addresses. Both ways have advantages and disadvantages. I prefer last solution because, it allow to protect my hosts completely. Cons of this method – near 700-800 rules into firewall, that can slow down your host.
Anyway, first that i done – simply script that fetch list of IP and print them to standard output. When i started to writing script i wanted to expand features in future. I want to generate ready firewall rules for example, but now this script can only print list of IP’s. I do not want to integrate firewall rules application in this script, because i think this job must be done by another script.
So, now this script only fetch and print IP addresses or exit with error code if can not do it:
#!/usr/bin/perl -w use strict; use LWP::Simple; my $list = get("http://exitlist.torproject.org/exit-addresses"); my $i; my @ips; if( ! defined( $list ) ) { die( "Can not fetch addresses.\n" ); } foreach $i (split( /\n/, $list )) { push( @ips, $1 ) if( $i =~ m/((?:\d{1,3}\.){3}\d{1,3})/); } if( defined( $ARGV[0] ) && $ARGV[0] eq "-ip" ) { print( join( "\n", @ips )); } else { die( "Usage $0 -ip\n" ); } |
Next that you need – apply rules on firewall. As i say before, when you apply one rule per IP you will get near 700-800 rules, it is reason why you need optimize sequence of your rules. It can be done in next manner:
1. Rule to accept packets flowing thru loopback.
2. Rule to accept packets of RELATED and ESTABLISHED connections.
3. Rule to drop packets from blacklisted sources.
4. Rule to accept packets from whitelisted sources.
5. Rule for fail2ban (optional).
6. Rule for Tor exit nodes.
7. Other rules (for example, accept connection on ssh, http, https ports).
This sequence allow to make decision for most packets before they pass Tor filtration rules.
I organize Tor filtration rules in separate table called TorExitnodes, it allow to update only this table and do not touch other firewall rules. Also i create table TorBlockAndLog that contain LOG and DROP target, but it is optional, you can simply drop packets.
For updating firewall rules for exit nodes i made next bash scrip and place it in cront:
#!/bin/bash SOLVE="/root/bin/solve.pl" if /usr/bin/perl $SOLVE then /sbin/iptables -F TorExitnodes /sbin/iptables -I TorExitnodes -j RETURN for i in `/usr/bin/perl $SOLVE -ip` do /sbin/iptables -I TorExitnodes -s $i -j TorBlockAndLog done else echo "Can not fetch Tor exit nodes" 1>&2 exit 1; fi |
Where is variable “SOLVE” store path to previous perl script, as i say before, if you do not need special action for incoming connections from Tor, you can change “TorBlockAndLog” on “DROP”.
Thats all.
PS
It is good idea to place whitelist before TorExitnodes, who can know, may be one fine day you found -s 0.0.0.0/0 -j DROP into this table. =)
Password protected access to “/wp-admin” on nginx
Here i found advice how to make wordpress more securely, idea is to protect access to “/wp-admin” by http auth, but “/wp-admin/admin-ajax.php” must stay available for everyone, same is true for some .css files.
I spend some time to research solution, it was a bit complicated:
location /wp-admin { location ~ /wp-admin/admin-ajax.php$ { # Php handler } location ~* /wp-admin/.*\.php$ { auth_basic "You shall not pass!"; auth_basic_user_file $document_root/.htpasswd; # Php handler } } |
It is possible to add additional location to serve static content, but i am too lazy to do it.
PS
Also here i found receipts for apache and lighttpd if anybody interesting. Continue reading
Forbid access to php into “wp-content”.
I expected in few articles an advice to disable direct access to php scripts into “/wp-content/uploads” i done small research and observed, than .php placed into “/wp-content” and into subdirs was newer directly accessed thru web. So i just completely disabled direct access to php scripts placed into that dir and subdirs. Looks more securely.
PS
I made mistake. At least tiny-mce php scripts must be accessible thru web. So i just convert this rules that touch ‘/wp-include’ for nginx:
location ~* /wp-includes { location ~* /wp-includes/[^/]+\.php$ { deny all; } location ~* /wp-includes/js/tinymce/langs/.+\.php$ { deny all; } location ~* /wp-includes/theme-compat { deny all; } location ~ /wp-includes/.+\.php$ { include php_wordpress_handler; } } |