Repairing of kitchenaid phase control board

It’s a story how I spent thee days troubleshooting 9 elements circuit when 7 of them are passive. I didn’t found what’s wrong, but fixed it.

Foreword:
I have  control board marked as W10354309, it’s European 220V model of phase regulator.
I wonder which logic behind kitchenaid’s parts marking, I found several part numbers for 220V version: 3184417, 4163707, 4163712, 9701269, 9706596, W10217542, W10538289, W10911442, W11174552, WPW10538289
(110V version have same idea and same schematic, just different values and ratings for some elements)
I don’t know why they do that. Probably because they use the same part on different models and/or under different brands.
So, I have 5ksm125 mixer and W10354309 phase control.

Service manual says, that at the first speed planetary shaft should have near 60RPM, but in my case it had near 120RPM and I was unable to decrease it by tuning control plate.

Here I should make a digression, these mixers have ability to maintain constant RPM under different load.  I was surprised when I learn how do they do that. One of the main component comes right from the steam engine era, it’s centrifugal governor which is placed on the shaft of the motor, here it is:
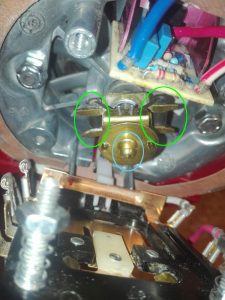
Yellow thing is the governor itself, black cylinders highlighted with green – weights, central pin stroked with blue is a pin which provides feedback to control plate. It works simple, the more RPM motor have the more pin extends.

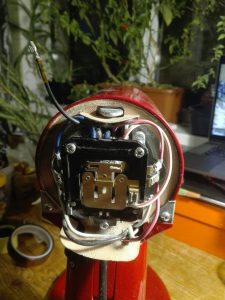
Next component is so called control plate, in fact it has simple main switch and a T shaped contact. The main switch  just break circuit when you move switch lever to off. T-contact plate just shorts contacts on a plate in 3 different configuration. The white tab on a picture above is a dielectric tab on T-contact, governor’s central pin pushes this tab and changes which contacts are closed on control plate. Here is control plate from the other side:
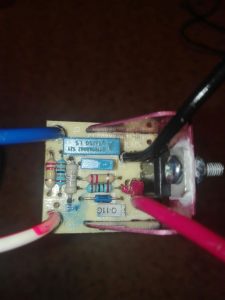
And the last component is a phase control board, it’s basically dimmer if you google for ‘dimmer circuit’ you will find the same scheme as used in phase control board with one exception, usually dimmers have variable resistor for smooth regulation, phase control board has resistors network in which resistors shorts by control board in 3 different configuration. You can see it  behind top edge of contral board on the picture above and on closeup photo on picture below:
So, how its work together? Here is schematic from repair manual with comments and nominals added by me:
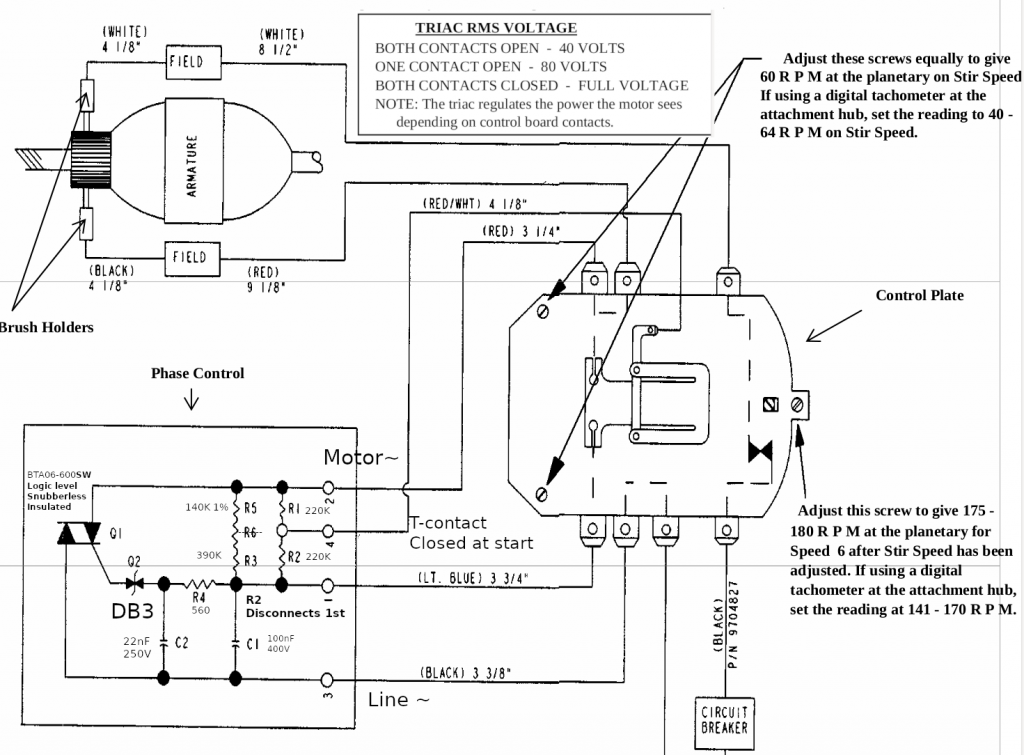
As I sad before control plate can be in 3 different states:
The first: the motor has too low RPM or doesn’t turn at all. T-contact fully closed, it shorts resistor network (R1, R2, R3, R5) completely and feeds motor with almost full sine wave (DIAC Q2 opens at around of 30V, so the start of the wave is chopped a little bit)
The third: the motor has too much RPM. T-contact fully opened, resistors network has maximum resistance,  phase control board feeds motor with minimum amount of energy (manual says that it should provide 40V RMS, I don’t understand why it’s true for both 110V and 220V version, but looks like it is).
The second: this state is somewhere in between too low RPM and too much RPM, control board shorts R1, equivalent resistance is ((R5+R3)* R2)/(R5+R3+R2), manual says that it should provide 80V RMS.

The more RPM motor have, the more central pin of centrifugal governor extents, the more it shift T-contact. When T-contact shifting, it opens circuit with bottom contact first and with upper contact next (check schematic above). When you select mixer’s speed you change distance between control plate and governor, the more distance it has the faster motor should spins to get equilibrium between the first and the third states.

Finally I can tell about my issue.
Usually when phase control is broken mixer doesn’t cho-cho at all or doing it on max speed, my story was slightly different, it had near 120 constant RPM on the first 3 speeds, next speed or two  increased RPM to the maximum, and other speeds did nothing.

When I saw schematic, I was pretty sure that I just need to replace DIAC. In circuits like this, if something works wrong in 99 cases of 100 it caused by broken semiconductor. When TRIAC failed it usually stays open or shorted (motor shouldn’t run at all or run at full speed).

I changed DIAC but  nothing changed, motor had RPM above nominal, but not the maximum. RPM was enough to extent governor’s central pin to the maximum and open both contacts on control plate.

The next suspect was TRIAC, here is only two semiconductors, if one of them is OK, the other one is broken, right? Wrong. I tried two different TRIACs without success. BTA12-600SW (it has the same characteristics like original one. Logic level gate, gate’s current 10mA , snuberless, but rated for 12A instead of 6A) and BTA06-600CW ( it isn’t logic level and had gate current around 35mA, it produced visible sparks during re-commutations on control plate, so don’t use it).

What should be suspected next? Capacitors? Both had less than 5% difference of capacitance from their nominals. I tried other capacitors, RPM of motor changed, but not significantly (in theory failed capacitors may have noticeable different capacity under high voltage, but I tested them with low voltage LCR meter).

After that I started to go crazy, I even de-solder every resistor, but they had correct values.
I spent near 3 days trying to find what’s wrong.
I had a lot of theories: failed resistor which heats when voltage applied and changes its resistance, semi-broken wires, semi-broken motor etc.
I even found a topic in which people had the same issue, but no one find the solution: https://www.electronicspoint.com/forums/threads/kitchenaid-mixer-phase-control-board-problem.241021/page-2

Soon after I started my experiments, I found that everything works as expected when I put R4 with increased value, but I wanted to find why circuit which had right elements didn’t work as it should.
At the end of the third day I gave up. I tried to replace every resistor, every capacitor in circuit and it didn’t helped, I tried to solder wires in parallel with existent,
In the end I decided to put 3.6KOhm R4 instead of original 560Ohm.

Here is my observations:

  • Manuals says that you can check phase control by putting sheet of non conductive material (like papper) between T-contact and contact which it touches, if it’s OK it should provide around 40V, but I got 50V. When I lovered voltage to 40V I got response from control plate regulation.
  • Motor starts spinning at around 9V DC.
  • Coils of stator has resistance of 7.8 Ohm each, rotor has resistance near 4 Ohm between nearest contacts, resistance of motor (between red and white wire) near 40 Ohm.
  • Circuit is sensible to element’s values, even when I tried to put capacitors with the same value I got slightly different RPM. My circuit has 1% R5, old scheme from manual has 3 resistors in series, usually this approach used when resistors have breakdown voltage less than voltage drop on them or when you want to use few cheap 5% 10% resistors instead of precise one.
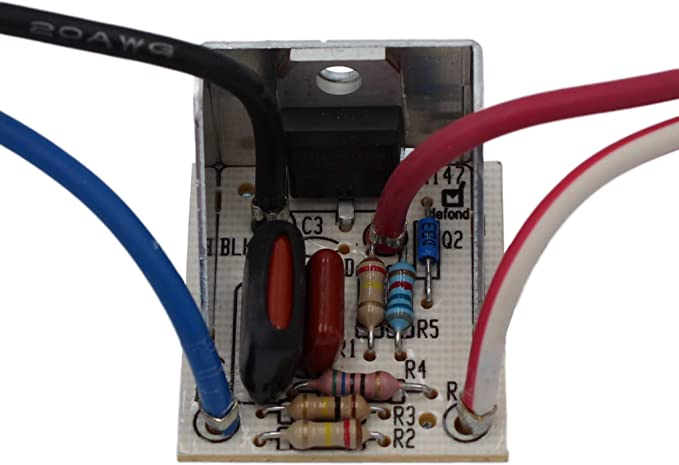
  • Probably phase control boards with  different part numbers more stable. I found photos of others boards and saw that resistors have values different from values that observed. Here is an example from amazon:
Lenovo battery hack and whitelist at the same time

Recently I’ve got x230 laptop and have a plan to change buggy Intel Centrino 6205 adapter to something like Atheros, also I decided that it’s worth to have ability to use x220 like batteries, just in case.
To achieve that, I needed to flash patched firmware for EC controller (thinkpad-ec project) and modified bios (1vyrain project), but it was confusing, what should go first? Firstly I didn’t realised that thinkpad-ec flashes only EC firmware, it looked like EC mod will update bios to newer version than supported by 1vyrain, same time 1vyrain would update bios to version newer than supported by thinpkad-ec.
Finally, here is how to have EC mod together with patched BIOS on x230 laptop:
1. BIOS should be old enough to be compatible with  1vyrain and thinpkad-ec, at 2020-03-22 it should be not newer than 2.60 (1vyrain has requirements of more older bios than thinkpad-ec, requirements for 1vyrain patch can be found here)  otherwise it should be downgraded as described here.
2. Make bootable device with thinkpad-ec image, in BIOS set boot mode to ‘Legacy’ and update EC firmware.
3. Make bootable device with 1vyrain image, in BIOS set boot mode “UEFI only”, disable “Secure boot” and update BIOS.

In my case I ended with BIOS version 2.77 EC version 1.14.

Dirty hack to add values mappings in Zabbix

“I’ll be brief.” ©
Here is two things about script published in ZBXNEXT-1424, first it can help you to automate creation of large mappings (and it’s cool), second it will broke your DB (not so cool, maaan).
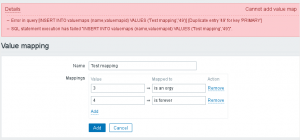
When you will try to add mapping in broken DB you will see something like this:

poorzabbix

The “Error in query [INSERT INTO valuemaps (name,valuemapid) VALUES (‘Test mapping’,’50’)] [Duplicate entry ’50’ for key ‘PRIMARY’]” mean, that in table valuemaps you already have entry with valuemapid = 50. Why it happened i tell later after we fix DB.

To fix DB, you need to update few entries in table ‘idx‘, first update nextid where table_name = valuemaps:

mysql> update ids set nextid = (select max(valuemaps.valuemapid)+1 from valuemaps) where table_name = 'valuemaps';
Query OK, 1 row affected (0.22 sec)
Rows matched: 1 Changed: 1 Warnings: 0

Second update nextid for mappings:

mysql> update ids set nextid = (select max(mappings.mappingid)+1 from mappings) where table_name = 'mappings';
Query OK, 1 row affected (0.22 sec)
Rows matched: 1 Changed: 1 Warnings: 0

Here it is!

This happened because script does not update table idx. May be it’s ok for zabbix 2.0 that mentioned in feature request, but it’s broke database for zabbix 2.2 and newer. Unfortunately zabbix prior version 3.0 does not have API or ability to import mappings , so that script still useful.

Here is fixed script, i hope author will not offended at me:

#!/usr/bin/perl
 
use warnings;
use strict;
 
my $usage = "$0 valueMapName number newvalue [number2 newvalue2 [...]]
E.g.: 
 $0 'Alarm Status' 1 ok 2 unknown 3 stale 4 problem
 $0 'Aliveness' 0 dead 1 alive
";
 
my $valueMapName = shift() || die "No new valuemap name";
my @mapList = @ARGV;
die "No mappings given. Usage: $usage\n" if scalar(@mapList) == 0;
 
 
my $isEvenNumber = scalar(@mapList) % 2 == 0;
die "Must give mapping->value pairs. Usage: $usage\n" if not $isEvenNumber;
my %mappings = @mapList;
 
my $newValueMapId = int(qx/mysql -N -s -e 'select nextid from zabbix.ids where field_name = "valuemapid"'/) ||
die("Can't fetch max valuemapid\nUsage: $usage\n");
$newValueMapId++;
my $newMappingId = int(qx/mysql -N -s -e 'select nextid from zabbix.ids where field_name = "mappingid"'/) ||
die("Can't fetch max mappingid\nUsage: $usage\n");
$newMappingId++;
 
eval {
 my $valueMapCmd = qq/mysql -e "insert into zabbix.valuemaps (valuemapid, name) values ('$newValueMapId', '$valueMapName');"/;
 print "$valueMapCmd\n";
 system $valueMapCmd;
 eval {
 for my $from (keys %mappings) {
 my $to = $mappings{$from};
 my $mappingCmd= qq/mysql -e "insert into zabbix.mappings (mappingid, valuemapid, value, newvalue) values ('$newMappingId', '$newValueMapId', '$from', '$to');"/;
 print "$mappingCmd\n";
 system $mappingCmd;
 $newMappingId++;
 }
 };
 if ($@) {
 die "something went wrong inserting into mappings $@";
 }
};
if ($@) {
 die "something went wrong inserting into valuemaps $@";
}
 
my $valueMapUpdCmd = qq/mysql -e 'update zabbix.ids set nextid = "$newValueMapId" where field_name = "valuemapid";'/;
print "$valueMapUpdCmd\n";
system $valueMapUpdCmd;
$newMappingId--;
my $mappingUpdCmd = qq/mysql -e 'update zabbix.ids set nextid = "$newMappingId" where field_name = "mappingid";'/;
print "$mappingUpdCmd\n";
system $mappingUpdCmd;


LVM recovery

Few days ago i made mistake and forced fsck to check partition that contain LVM instead of logic volume, as result i got broken LVM metadata. I was unable to see volume group an logic volumes.
pvs output looked like that:

# pvs -v

Scanning for physical volume names
Incorrect metadata area header checksum

I tried to run pvck but it did not help me, it founded corrupted metadata but did not repair LVM:

# pvck -d -v /dev/md5
Scanning /dev/md5
Incorrect metadata area header checksum
Found label on /dev/md5, sector 1, type=LVM2 
Found text metadata area: offset=4096, size=193024
Incorrect metadata area header checksum

Finally i founded that it’s possible to make backups of LVM metadata and restore it when needed, but i think that i had only broken LVM with broken metadata.
It’s hard to describe how happy I was when I found that by default LVM create backups of metadata when you make any changes. I found it into /etc/lvm/backup dir, after that recovery become easy task, first i recreate physical volume:

pvcreate -u b3Lk2a-pydG-Vhf3-DSEJ-9b84-RLm9-UEr6r3 --restorefile /etc/lvm/backup/vg-320 /dev/md5

UUID can be founded in pv section into metadata file:

 physical_volumes {
 
 pv0 {
 id = "<strong>b3Lk2a-pydG-Vhf3-DSEJ-9b84-RLm9-UEr6r3</strong>"
 device = "/dev/md5" # Hint only

Next i restored volume group:

vgcfgrestore -f /etc/lvm/backup/vg-320 vg-320

After that logical volumes became visible:

# lvs
 LV VG Attr LSize Pool Origin Data% Move Log Copy% Convert
 root vg-320 -wi-a--- 15.00g 
 swap vg-320 -wi-a--- 1.00g 
 var vg-320 -wi-ao-- 200.00g 
 zoneminder vg-320 -wi-a--- 15.00g

After reinitialization with vgscan -v && vgchange -ay commands, volume groups ready for fsck.

How to fix ‘Timezone database is corrupt – this should *never* happen!’

Today i upgraded to wheezy. When i entered my blog i observed that it does not work anymore. I looked into logs and found next errors:

[26-Jun-2013 12:59:41 UTC] PHP Fatal error:  date(): Timezone database is corrupt - 
this should *never* happen! in ...
[26-Jun-2013 12:59:49 UTC] PHP Fatal error:  strtotime(): Timezone database is 
corrupt - this should *never* happen! in /html/wp-includes/functions.php on line 33...

After a little investigation I discovered that happens when you use php in chroot enviroment (i using php5-fpm with chroot, so it is my case). I tried to copy /usr/share/zoneinfo in chroot environment with parent dir structure and correct permissions, but nothing change. Somewhere i read that it problem can happen in debian, because maintainers of php packages, patch source files, the solution – is to install tzdatadb:

apt-get install php-pear php5-dev
pecl install timezonedb
echo 'extension=timezonedb.so'> /etc/php5/mods-available/timezonedb.ini
ln -sf /etc/php5/mods-available/timezonedb.ini /etc/php5/conf.d/30-timezonedb.ini
service php5-fpm restart

After that all work like a charm.

PS

strings /usr/sbin/php5-fpm|grep Quake| head -n8
Quake I save: ddm4 East side invertationa
Quake I save: d7 The incinerator plant
Quake I save: d12 Takahiro laboratories
Quake I save: e1m1 The slipgate complex
Quake I save: e1m2 Castle of the damned
Quake I save: e2m6 The dismal oubliette
Quake I save: e3m4 Satan's dark delight
Quake I save: e4m2 The tower of despair

Easter egg?

Strange pattern on roof of my car

Strange pattern Yesterday before i go to sleep, i looked through the window and found strange circle on roof of my car. Day was very sunny and first i thought that something dark (like a leaf) fell on roof, heated it and melted snow. But edges was very sharp and it looked like accurate circle, next guess was that somebody forget something on my car or it just a prank. With these thoughts i fell asleep. At the morning i want to the car and found frozen water streams on the windshield and grounded battery. After that i remember that last sunday i tuned shock sensor and used lamp attached to roof inside the car. I remember that i swiched it off, but this lamp have strange complicated construction and i was not turned of it completely. The final surprise was that the car could not be opened with a remote control and  all locks on doors was blocked by dust (because i never used it before), but WD-40 saved the situation.