Unravel unknown thermistor

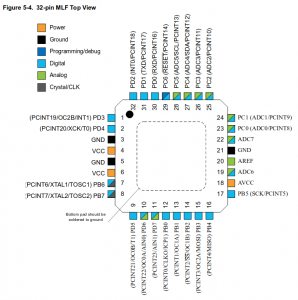
Recently I made mistake and made PCB for arduino module where connect temperature sensor to A7 PIN. I’ve envisaged that sensor could be analog (diode) or digital. Soon I’ve learned that diode doesn’t provide enough accuracy even for ±5℃ (2mV/℃) and surprise-surprise A7 pin is only analog input so I can’t use DS18B.
I had haven’t any other temp sensors, fortunately I’ve remembered that I have broken battery controller from laptop and it should have some sort of temp sensor, here it is:
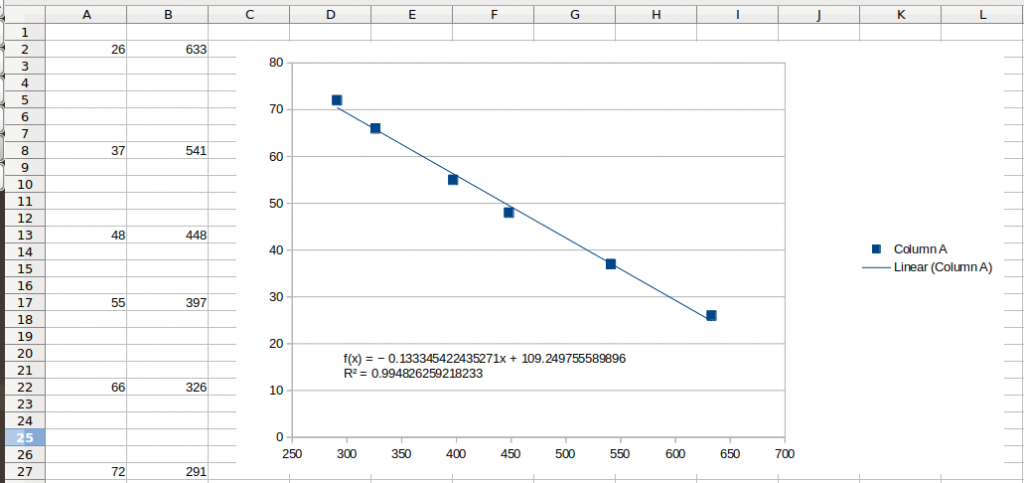
I’ve poked it with multimeter few times to be sure that it isn’t semiconductor sensor, but NTC with near 10K Ohm resistance at 25℃. I’ve decided to use it, but don’t know how much Ohm/℃ it has. I’ve planned to use linear approximation to convert resistance to temp, so i measure few points and here what i got:

Here is ADC value on X-Axis and temperature on Y-Axis. Pure perfect, i could use it with one pair of a and b coefficients in temperature range which i want.

How to update puppet 3 to puppet 4 on ubuntu 16

I spent near month to figured out why i can’t update puppet on ubuntu 16 with specially designed puppet_agent module. It was task full of confusing experience.

So, let’s start. For a beginning you shouldn’t debug update process from a console, because one of a bug related to puppet  service. You could solve all problem which you will found with ‘puppet agent -t’ but when you will try  to upgrade puppet when it daemonized, it will fail. So set ‘log_level=info’ in your puppet.conf and use kill to trigger puppet daemon.

 sudo kill -SIGUSR1 $(cat /var/run/puppet/agent.pid);

Next you should set ‘stringify_facts=false’ into puppet.conf. Now puppet_agent developers declared that they provide additional class ‘::puppet_agent::prepare::stringify_facts’ for that, but when i started upgrade procedure it wasn’t available (or i miss it), so here is external fact to provide stringify_facts settings and puppet.conf path:

require 'puppet'
 
Facter.add('puppet_config') do
 setcode do
 Puppet.settings['config']
 end
end
 
Facter.add('puppet_stringify_facts') do
 setcode do
 Puppet.settings['stringify_facts'] || false
 end
end

Call it something like puppet.rb and put it into <YOURMODULEDIR>/lib/facter.
Next puppet code will disable stringify_facts before doing upgrade:

if versioncmp($::clientversion, '4') < 0 {
 if $::puppet_stringify_facts {
 augeas { 'puppet.conf.stringify_facts':
 context => "/files${::puppet_config}/main",
 changes => [
 'set stringify_facts false',
 ],
 }
 } else {
<Do puppet upgrade here>
}

If you have puppet service defined somewhere, you will be faced with duplicate service declaration:

Feb 16 09:09:59 localhost puppet-agent[10026]: Could not retrieve catalog from remote server: Error 500 on SERVER: {"message":"Server Error: Evaluation Error: Error while evaluating a Resource Statement, Evaluation Error: Error while evaluating a Resource Statement, Duplicate declaration: Service[puppet] is already declared in file CUT:47; cannot redeclare at /etc/puppetlabs/code/environments/production_puppet4/modules/puppet_agent/manifests/service.pp:31 at /etc/puppetlabs/code/environments/production_puppet4/modules/puppet_agent/manifests/service.pp:31:7 on node llocalhost","issue_kind":"RUNTIME_ERROR","stacktrace":["Warning: The 'stacktrace' property is deprecated and will be removed in a future version of Puppet. For security reasons, stacktraces are not returned with Puppet HTTP Error responses."]}

So you should declare puppet_agent class in next maner:

 class {'::puppet_agent':
 collection => 'PC1',
 service_names => [],
 notify => Service['puppet']
 }

Interesting what will happens now if you will try to update puppet?

Feb 16 09:16:32 localhost puppet-agent[10474]: Caught TERM; exiting
Feb 16 09:16:32 localhost puppet-agent[8171]: Caught TERM; exiting
Feb 16 09:16:32 localhost systemd[1]: Stopping Puppet agent...
Feb 16 09:16:36 localhost systemd[1]: Stopped Puppet agent.

Tadaaam. Now you have barely installed puppet-agent package, deleted previous puppet package and killed puppet daemon:

ichurkin@localhost:~$ pgrep -f puppet
ichurkin@localhost:~$ dpkg -l|grep puppet
rF puppet 3.8.5-2 all configuration management system, agent
ii puppet-common 3.8.5-2 all configuration management system

It happens because during puppet-agent package installation systemd killed puppet daemon and all its children. So you need to fix unit file first:

[Service]
KillMode=process

Call it something like service.override.conf and put into <YOURMODULEDIR>/files, puppet code to fix that:

if $::os['name'] == 'Ubuntu' and versioncmp($::os['release']['major'], '16') >= 0 {
notify{ "Creating systemd ovveride file":}
 file {'/etc/systemd/system/puppet.service.d/':
 ensure => directory
 }~>
 file { '/etc/systemd/system/puppet.service.d/override.conf':
 mode => '0644',
 owner => 'root',
 group => 'root',
 source => 'puppet:///modules/puppet/puppet.service.override',
 }~>
 exec { 'systemd_reload':
 command => 'systemctl daemon-reload',
 path => [ '/usr/bin', '/bin', '/sbin', '/usr/sbin' ],
 refreshonly => true,
 before => Class['::puppet_agent']
 }

I tried to use fact ${::service_provider} instead of ugly os/release condition, but at least puppet 3.8 on ubuntu 16 return ‘debian’ instead of ‘systemd’.

Let’s update puppet?

Feb 16 04:49:14 localhost puppet-agent[10021]: Could not start Service[puppet]: Execution of '/usr/sbin/service puppet start' returned 1: Failed to start puppet.service: Unit puppet.service is masked.
Feb 16 04:49:14 localhost puppet-agent[10021]: (/Stage[main]/Puppet_agent::Service/Service[puppet]/ensure) change from stopped to running failed: Could not start Service[puppet]: Execution of '/usr/sbin/service puppet start' returned 1: Failed to start puppet.service: Unit puppet.service is masked.

Once again puppet render itself stopped, i think it may caused because service provider is debian instead of systemd, i too exhausted to search for right solution, so here another one dirty hack:

 exec { 'puppetagent_transition_restart':
 path => '/bin:/sbin:/usr/bin:/usr/sbin',
 command => '/opt/puppetlabs/bin/puppet resource service puppet enable=true ensure=running',
 require => Class['::puppet_agent']
 }

That’s all.

PS

List of related bugs below:
https://tickets.puppetlabs.com/browse/MODULES-3453
https://tickets.puppetlabs.com/browse/PUP-5637
https://tickets.puppetlabs.com/browse/PUP-3931
https://github.com/puppetlabs/puppet/pull/3699
https://github.com/puppetlabs/puppet/pull/3700
https://tickets.puppetlabs.com/browse/PUP-4512


Converting SNMP enumerations to Zabbix value mappings

Many of those, who tried to use Zabbix for monitoring SNMP capable devices faced with need of creating value mappings. It’s ok to create them by hands if mapping contain few values and you don’t have many metrics that uses ‘named-numbers’.
For those who have not had fortune to face with this, I will explain. Enumerations it’s some sort of agreement about how to code different states or types or something identical by using only integer values. For example let’s see on SNMPv2-MIB::snmpEnableAuthenTraps:

1
2
3
4
5
6
7
8
9
10
11
12
13
14
15
16
17
18
% snmptranslate -Td SNMPv2-MIB::snmpEnableAuthenTraps
SNMPv2-MIB::snmpEnableAuthenTraps
snmpEnableAuthenTraps OBJECT-TYPE
 -- FROM SNMPv2-MIB
 SYNTAX INTEGER {enabled(1), disabled(2)} 
 MAX-ACCESS read-write
 STATUS current
 DESCRIPTION "Indicates whether the SNMP entity is permitted to
 generate authenticationFailure traps. The value of this
 object overrides any configuration information; as such,
 it provides a means whereby all authenticationFailure
 traps may be disabled.
 
Note that it is strongly recommended that this object
 be stored in non-volatile memory so that it remains
 constant across re-initializations of the network
 management system."
::= { iso(1) org(3) dod(6) internet(1) mgmt(2) mib-2(1) snmp(11) 30 }

Here you can see, that integer ‘1’  used to code ‘enabled’ and ‘2’ for ‘disabled’, so if you want to see in your zabbix human friendly ‘enabled/disable’, you need to create value in your zabbix mapping first. It’s not a difficult task, if your mapping small like this, but it’s pain in the ass if your mapping consist many values. For example IF-MIB::ifType consist of 254 values. For completeness i need to say, that prior zabbix 3.0 you had not legal way to automate it.

When i first time searching for solution, i found that script in feature request ZBXNEXT-1424
Unfortunately it will break your db, about it you can read here. In Zabbix 3.0  value mappings API was introduced, now you are able to import/export mappings in XML format or you can do it via RPC.

Looks like it’s time to a perl magic. Tadaam! Script that generate value mapping in XML format for specified OID. I placed it onto github: https://github.com/IvanBayan/Zabbix-oid2valuemapping here you will find requirements and examples of usage. In short you type in console something like this:

% perl ./oid2valuemapping.pl --oid SNMPv2-MIB::snmpEnableAuthenTraps

And it will generate something like this:

 <?xml version='1.0' standalone='yes'?>
<zabbix_export>
 <date>2016-08-26T14:51:09Z</date>
 <value_maps>
 <value_map>
 <name>snmpEnableAuthenTraps</name>
 <mappings>
 <mapping>
 <newvalue>disabled</newvalue>
 <value>2</value>
 </mapping>
 <mapping>
 <newvalue>enabled</newvalue>
 <value>1</value>
 </mapping>
 </mappings>
 </value_map>
 </value_maps>
 <version>3.0</version>
</zabbix_export>

You need only few additional modules for perl and configured snmp.

Dirty hack to add values mappings in Zabbix

“I’ll be brief.” ©
Here is two things about script published in ZBXNEXT-1424, first it can help you to automate creation of large mappings (and it’s cool), second it will broke your DB (not so cool, maaan).
When you will try to add mapping in broken DB you will see something like this:

poorzabbix

The “Error in query [INSERT INTO valuemaps (name,valuemapid) VALUES (‘Test mapping’,’50’)] [Duplicate entry ’50’ for key ‘PRIMARY’]” mean, that in table valuemaps you already have entry with valuemapid = 50. Why it happened i tell later after we fix DB.

To fix DB, you need to update few entries in table ‘idx‘, first update nextid where table_name = valuemaps:

mysql> update ids set nextid = (select max(valuemaps.valuemapid)+1 from valuemaps) where table_name = 'valuemaps';
Query OK, 1 row affected (0.22 sec)
Rows matched: 1 Changed: 1 Warnings: 0

Second update nextid for mappings:

mysql> update ids set nextid = (select max(mappings.mappingid)+1 from mappings) where table_name = 'mappings';
Query OK, 1 row affected (0.22 sec)
Rows matched: 1 Changed: 1 Warnings: 0

Here it is!

This happened because script does not update table idx. May be it’s ok for zabbix 2.0 that mentioned in feature request, but it’s broke database for zabbix 2.2 and newer. Unfortunately zabbix prior version 3.0 does not have API or ability to import mappings , so that script still useful.

Here is fixed script, i hope author will not offended at me:

#!/usr/bin/perl
 
use warnings;
use strict;
 
my $usage = "$0 valueMapName number newvalue [number2 newvalue2 [...]]
E.g.: 
 $0 'Alarm Status' 1 ok 2 unknown 3 stale 4 problem
 $0 'Aliveness' 0 dead 1 alive
";
 
my $valueMapName = shift() || die "No new valuemap name";
my @mapList = @ARGV;
die "No mappings given. Usage: $usage\n" if scalar(@mapList) == 0;
 
 
my $isEvenNumber = scalar(@mapList) % 2 == 0;
die "Must give mapping->value pairs. Usage: $usage\n" if not $isEvenNumber;
my %mappings = @mapList;
 
my $newValueMapId = int(qx/mysql -N -s -e 'select nextid from zabbix.ids where field_name = "valuemapid"'/) ||
die("Can't fetch max valuemapid\nUsage: $usage\n");
$newValueMapId++;
my $newMappingId = int(qx/mysql -N -s -e 'select nextid from zabbix.ids where field_name = "mappingid"'/) ||
die("Can't fetch max mappingid\nUsage: $usage\n");
$newMappingId++;
 
eval {
 my $valueMapCmd = qq/mysql -e "insert into zabbix.valuemaps (valuemapid, name) values ('$newValueMapId', '$valueMapName');"/;
 print "$valueMapCmd\n";
 system $valueMapCmd;
 eval {
 for my $from (keys %mappings) {
 my $to = $mappings{$from};
 my $mappingCmd= qq/mysql -e "insert into zabbix.mappings (mappingid, valuemapid, value, newvalue) values ('$newMappingId', '$newValueMapId', '$from', '$to');"/;
 print "$mappingCmd\n";
 system $mappingCmd;
 $newMappingId++;
 }
 };
 if ($@) {
 die "something went wrong inserting into mappings $@";
 }
};
if ($@) {
 die "something went wrong inserting into valuemaps $@";
}
 
my $valueMapUpdCmd = qq/mysql -e 'update zabbix.ids set nextid = "$newValueMapId" where field_name = "valuemapid";'/;
print "$valueMapUpdCmd\n";
system $valueMapUpdCmd;
$newMappingId--;
my $mappingUpdCmd = qq/mysql -e 'update zabbix.ids set nextid = "$newMappingId" where field_name = "mappingid";'/;
print "$mappingUpdCmd\n";
system $mappingUpdCmd;


LVM recovery

Few days ago i made mistake and forced fsck to check partition that contain LVM instead of logic volume, as result i got broken LVM metadata. I was unable to see volume group an logic volumes.
pvs output looked like that:

# pvs -v

Scanning for physical volume names
Incorrect metadata area header checksum

I tried to run pvck but it did not help me, it founded corrupted metadata but did not repair LVM:

# pvck -d -v /dev/md5
Scanning /dev/md5
Incorrect metadata area header checksum
Found label on /dev/md5, sector 1, type=LVM2 
Found text metadata area: offset=4096, size=193024
Incorrect metadata area header checksum

Finally i founded that it’s possible to make backups of LVM metadata and restore it when needed, but i think that i had only broken LVM with broken metadata.
It’s hard to describe how happy I was when I found that by default LVM create backups of metadata when you make any changes. I found it into /etc/lvm/backup dir, after that recovery become easy task, first i recreate physical volume:

pvcreate -u b3Lk2a-pydG-Vhf3-DSEJ-9b84-RLm9-UEr6r3 --restorefile /etc/lvm/backup/vg-320 /dev/md5

UUID can be founded in pv section into metadata file:

 physical_volumes {
 
 pv0 {
 id = "<strong>b3Lk2a-pydG-Vhf3-DSEJ-9b84-RLm9-UEr6r3</strong>"
 device = "/dev/md5" # Hint only

Next i restored volume group:

vgcfgrestore -f /etc/lvm/backup/vg-320 vg-320

After that logical volumes became visible:

# lvs
 LV VG Attr LSize Pool Origin Data% Move Log Copy% Convert
 root vg-320 -wi-a--- 15.00g 
 swap vg-320 -wi-a--- 1.00g 
 var vg-320 -wi-ao-- 200.00g 
 zoneminder vg-320 -wi-a--- 15.00g

After reinitialization with vgscan -v && vgchange -ay commands, volume groups ready for fsck.

Simple OpenVPN profile generator

Few month ago i learned that OpenVPN support profiles. Before that i generate config for every client, create keys and certs with easy-rsa, tar it’s all together and put on client. Now i can create profile that will contain all necessary keys, certs and config in one file, so i write simple script that generate .ovpn profile for new client.
Generated .ovpn profile can be imported from sd card in Android, via iTunes or email in iOS, or just type `openvpn your_new_profile.ovpn` at PC.
Prerequisites: configured easy-rsa (`pkitool clientname` must produce cert and key for client).
You must customize config part for your server, it is possible to fetch data from server config file, but i’m too lazy to modify script for it.
There is it:

#!/bin/bash
#Dir where easy-rsa is placed
EASY_RSA_DIR="/etc/ssl/easy-rsa"
KEYS_DIR="$EASY_RSA_DIR/keys"
# Dir where profiles will be placed
OVPN_PATH="/root/ovpn"
REMOTE="your.server port"
 
 
if [ -z "$1" ]
then 
        echo -n "Enter new client common name (CN): "
        read -e CN
else
        CN=$1
fi
 
 
if [ -z "$CN" ]
        then echo "You must provide a CN."
        exit
fi
 
cd $EASY_RSA_DIR
if [ -f $KEYS_DIR/$CN.crt ]
then 
        echo "Certificate with the CN $CN already exists!"
        echo " $KEYS_DIR/$CN.crt"
else
source ./vars > /dev/null
./pkitool $CN
fi
 
cat > $OVPN_PATH/${CN}.ovpn << END
client
dev tun
resolv-retry infinite
nobind
persist-key
persist-tun
verb 1
comp-lzo
proto tcp
remote $REMOTE
 
<ca>
`cat $KEYS_DIR/ca.crt`
</ca>
 
<cert>
`sed -n '/BEGIN/,$p' $KEYS_DIR/${CN}.crt`
</cert>
 
<key>
`cat $KEYS_DIR/${CN}.key`
</key>
END

KIS-3R33 calculator

Half year ago i wanted to get  in car  PSU to charge my smartphone or to power devices like camcoder. I wanted to build powerful  power supply, first i tried to build it on chip NCP3155, but has failed. I lurking around to find another chip and found complete module KIS-3R33 based on MP2307 chip. I found it very interesting and cheap, after i got few i started to find way how to change output voltage from 3.3V to 5V. I found many guides how to change Vout, by replacing internal components and all of them ignore the fact, that module have Adjust pin. I wanted to find way how to change Vout without replacing internal components.
KIS-33R3 very similar to  typical application:
screenshot14
Datasheet give ratio for calculation of Vout depend of R1 and R2:
Vout = 0.925* (R1 + R2) / R2
According to scheme of module that i found into the internet, Adjust pin connected to FB in series with resistor of 3.3kOhm:
Kis-3r33s_Diag.jpg

R1 = 25.5 kOhm (two 51kOhm resistors in parallel), so it is possible to vary R1 in range 25.5 kOhm – 2.9 kOhm and R2 in range 10 kOhm – 2.48 kOhm it give output range 1.19V – 10.43V. If you need voltage more than 5V, you need to remove zener diode first (D2 on scheme), because this diode limit Vout to 5.1V. Also voltage range of output capacitor (C2 on scheme) is not know, so it is good idea to replace it with capacitor that can handle your output voltage.
I wrote simple calculator for KIS-3R33 that compute resistor that you must connect between Adj pin and GND or Vout to get desired voltage. Don’t forget, that result will correct only for KIS-3R33 that have 3.3V output (i seen version that have 2.7V output, so be careful).

Vout = V

NaN

Libvirt + vnc + sasl

Error: connection to hypervisor host got refused or disconnected!Yesterday i wanted to configure libvirt with kvm virtualization, while i read comments in config file, i observed, that qemu can share credentials  with  libvirt via sasl. Also i found few how-to, that said ‘just copy /etc/sasl2/libvirt.conf to /etc/sasl2/qemu.conf’.
I done that, but when i tried to open console of VM i got “Error: connection to hypervisor host got refused or disconnected!”.
May be you think, that you can find something interesting in log? Nope. May be you think that you can run virt-manager in debug mode and will see something useful? Nope. The reason, why this happened is because, libvirt  run as root, but they start VM’s as libvirt-qemu user. And sasl2 database has owner root:root and 640 permissions. I changed owner of /etc/libvirt/passwd.db to libvirt-qemu:root and problem is gone.

STM32 performance test or how fast you can serve input signal

Finally, i decided to try stm32, before i wrote firmwares only for AVR mega family (from now, when i say AVR MCU, i mean AVR mega family MCU), and was scared by tonns of code that you need for simply led blinking on STM32 MCU.
Now i can say, that programming of STM32 not so hard as it looks first time. After i understand logical structure of MCU core and how it work, it become easy.
OK, it was prelude.

Every time when i see comparison between AVR and STM32/STM8 MCU’s i faced with next arguments:
STM MCU’s have lower price, when they have more RAM, FLASH, GPIO pins and work frequency. Looks sweet. Today i want to tell the story about work frequency.

More than the operating frequency of the MCU, the faster it can handle events. STM32 MCU’s have maximum work frequency more than 20MHz (72MHz for STM32F103 that i have), when AVR MCU’s have only 20MHz. Is 72MHz a lot of or not? Two week ago i wanted to know, is it enough ~200MHz of STM32F4 to handle 10MSPS ADC on not? Two weeks ago i think ‘may be’. Now i think ‘not enought’.

Last Friday evening i blow the dust from oscilloscope and made little research.
My basic code poll pin, by software, configured for input and set same signal on output pin, the code is there:

while(1) {
         if( GPIOB->IDR & GPIO_IDR_IDR10 ) {
                        GPIOB->BSRR = GPIO_BSRR_BS8;
         } else {
                        GPIOB->BSRR = GPIO_BSRR_BR8;
         }
}

How many time MCU need to set same level on GPIO pin as on input pin?  May be 140nS (near 10 clocks on 72MHz) will enought?
stm32_delay_O0

Nope. 480ns. It near 34 cycles. The period of 480ns has frequency of 2MHz, may be i forgot to change speed of gpio port?

stm32_debug_toggle_pin_50MHz

Nope. May be i forgot to switch on external quartz or forgot to configure PLL?

stm32_debug_pll

Nope. Hmm, may be optimization can help? Let’s try to switch on -O3:

stm32_delay_O3

Much better, 170 ns. MCU need near 12 cycles, to detect signal and change state of one GPIO speed. Do not forget, MCU just pooling one pin and change state of another, it do not do valuable work.Okay, but what the maximum speed you can get, if you will just change the state of GPIO pin?
Is it possible to hit theoretical maximum of 50MHz (max clock speed of GPIO ports on STM32F103):

stm32_toggle_pin

Just 6MHz. Let me switch on optimization for you:
stm32_toggle_pin_serial_0
Looks like there only 36MHz, let’s look on the code:

stm32_debug_toggle_pin_O3
I can’t see why they can’t reach 50MHz. If you look on disassembler view, you can see, that MCU just store different values on constant address.
In fairness i must to say, if you set cursors on oscilloscope in different manner, you can achieve 50MHz:

stm32_toggle_pin_serial_1
It is hard to say what way of measurement is wrong, i think the second, because first time it is easy to see time of 2 periods. Without a doubt, the second way STM advertising department would have liked more.
BONUS:
A picture where is while cycle occurs:
stm32_toggle_pin_serial_burst

Pulseview compilation

Half year ago i wanted to make device that can be used to clone ski pass. I thought that ski passes use RFID 125kHz. First i bought itead module RDM6300 but it turned out that it can only read tags, so i bought  EM4095 chip. At this time i also noticed, that most ski passes use MIFARE tags that operated at 13MHz.
Anyway i want to complete this project and build device that can read and write 125kHz tags (really there is to many different tags that operate on 125kHz and uses different protocols, so i want to start with EM4100 tags).That tags use manchester encoding to transfer data, also tags can use different bitrate. It is easy task to encode data into manchester, but it’s really pain in the ass if you want to decode them and does not know bitrate.
I have clone of saleae logic analizer so i decided to practice with decode manchester with libsigrokdecode. Sigrok have ‘official’ gui for libsigrok and libsigrokdecode called Pulseview.
I found that debian wheezy have old libsigrok and do not have pulseview at all, after that i decided to build sigrok and pulseview from scratch. It is really not easy quest, because additionally to libsigrok, libsigrokdecode you need to compile old libusb and libvisa.
Finally when i compiled all that stuff, i faced with errors when i tried to compile pulseview with decoders support.

First, libsigrokdecode need Python >= 3.0, Python.h placed in python3.2/Python.h, so you need to change it into libsigrokdecode.h:

./include/libsigrokdecode/libsigrokdecode.h:#include <python3.2/Python.h> /* First, so we avoid a _POSIX_C_SOURCE warning. */

Second, if you will got that error:

[ 40%] Building CXX object CMakeFiles/pulseview.dir/pv/view/decodetrace.cpp.o
/var/tmp/sigrok/pulseview/pv/view/decodetrace.cpp: In member function ‘virtual void pv::view::DecodeTrace::paint_mid(QPainter&, int, int)’:
/var/tmp/sigrok/pulseview/pv/view/decodetrace.cpp:203:3: error: ‘hash_combine’ is not a member of ‘boost’
/var/tmp/sigrok/pulseview/pv/view/decodetrace.cpp:204:3: error: ‘hash_combine’ is not a member of ‘boost’
/var/tmp/sigrok/pulseview/pv/view/decodetrace.cpp:205:3: error: ‘hash_combine’ is not a member of ‘boost’
make[2]: *** [CMakeFiles/pulseview.dir/pv/view/decodetrace.cpp.o] Error 1

Then you need to add “#include <boost/functional/hash.hpp>” into /var/tmp/sigrok/pulseview/pv/view/decodetrace.cpp

Third,  if you got that:

CMakeFiles/pulseview.dir/pv/data/decoderstack.cpp.o: In function `pv::data::DecoderStack::decode_proc(boost::shared_ptr<pv::data::Logic>)':
/var/tmp/sigrok/pulseview/pv/data/decoderstack.cpp:267: undefined reference to `srd_session_new'
/var/tmp/sigrok/pulseview/pv/data/decoderstack.cpp:283: undefined reference to `srd_inst_stack'

You need to add -lsigrokdecode into CMakeFiles/pulseview.dir/link.txt

I spent too many time to compile that stuff, so i decided to place here archive with complete libsigrok, libsigrokdecode, libvisa, libusb, sigrok and pulseview. I compiled it with preffix /opt/sigrok, so if you want to use it, place that stuff into /opt and run like that:

LD_LIBRARY_PATH=/opt/sigrok/lib /opt/sigrok/bin/pulseview

Enjoy: sigrok.tar
md5: 7bbb1d434959848c741230fe90a590c5 /tmp/sigrok.tar.gz
PS
Also you must install  libboost-thread.